Thursday, June 3, 2010
Creating a Large Space Between The Seats
The original Japanese manual do have some illustration on how to turn the middle row seats but if you don’t read Japanese, you may struggle trying to understand what the manual is trying to illustrate. In this post I will show you how to turn the middle row seats to face the rear row seats.
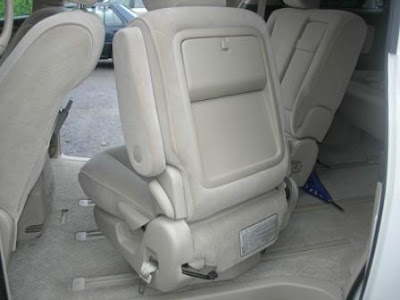
In the photo below it shows that the left middle seat has been slide forward slightly and the back rest is folded.
Only in this position will the middle seat turn. Turn the middle left seat clockwise as shown below
until it is facing the rear seat as shown below.
Finally you lift the back rest up and then slide the seat all the way to the front.
Do the same for the right middle seat but this time turn it anti-clockwise.
When middles seats are turned 180-degrees, you will now have a very large space between the seats.
This arrangement is very handy as it allow parents to reach the young children without having to climb over the middle seats.
Unfortunately, in the new generation Alphard/Vellfire, this feature has been removed. I wish they maintain that feature in the new generation Alphard/Vellfire as I think this is very useful. I am hoping that when I upgrade to the new Alphard in many years later I can still have this feature but looks like I have to settle with what I have at the moment.
Hope this help.
Saturday, November 7, 2009
After The Fact - Learn More Before You Buy Your Toyota Alphard
I don’t know if this is the latest trend but just this week I found also a few units of NFL AXs in my regular dealer come without original head unit. I know many owners have purchase their car with aftermarket head unit but in this case the car was not fitted with one at all. I consider myself lucky as my AX-L come loaded with all the features that normally not available in an AX-L. At least in all the TTs so far I have not seen another AX-L has the same spec as mine.
So what do the new owner losses when he bought the car?
Without the original head unit, he can’t make use of all the buttons on the steering wheel. He loses the hands-free function and the Bluetooth function. He loses the default reverse camera guide lines. He misses out the function to have the 30GB hard disk. He can’t play CD/DVD with the built in DVD function on the head unit. He doesn’t have the roof-mounted LCD monitor. At the end of the day he has to spent a few thousand dollars to retrofit an aftermarket head unit and other accessories just to be able to play DVD and to have the reverse camera view (but without the original guidelines). Since his unit doesn’t have the front camera, he will have to buy one if he wants the front camera view. If he wants to retrofit the other power door, that will cost him another few grand.
Therefore when I show this owner all the functions in my car that he could have gotten if he has opted for a different unit or one with the original head unit I can only imagine how unhappy for him to find out what he has missed.
I guess the new owner doesn’t know much about Toyota Alphard and probably hasn’t done much research on this subject. At least in the AOC forum I read that there are owners whose has done a lot of research and have scouted at many dealers before they commit to the unit that suits them. I think this is the way to go as there is no point in rushing to get something less at a higher price. In this case this particular owner is relying on the trustworthiness of the dealer who happened to be his friend to advise him on the best option to take. However like any dealer they just wanted to sell their car so they will take the easy way out by convincing the buyers that those features doesn't comes with the car. If the owner has done their homework then he would have not taken this car. I know this is after the fact and that the buyer should know what they are getting when they commit to buy a car. It would be nice to know that they gotten a better deal rather than to point it out to them the hard way.
I put up this blog with the hope it will help more potential buyers to learn more about this car so that they always get the best deal. If it is convenient I don’t mind meeting up with potential buyer to view the car with them so that they can make a better judgment before they commit their purchase. Send me a comment and I'll contact you if you need help.
Cheers
Thursday, July 16, 2009
Other Configuration Options in the HU
When you press the G-Book (情報-G) button, it will bring you to the G-Book Main Menu as shown below.
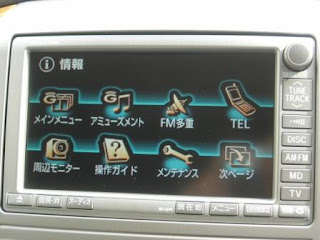
Touch the "Surrounding Monitor" ( 周辺モニタ) button to bring up this Setting screen.
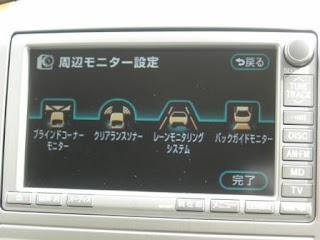 On this screen, touch the "Blind Corner Monitor" (ブラインドコーナーモニター) button to bring up this screen.
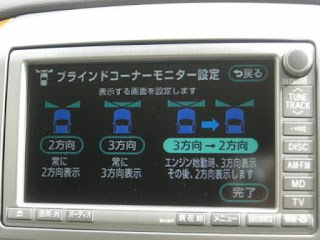 You select either 2-directions (2 方向), 3-directions (3 方向) or switchable between 2-directions and 3-directions. With the last option, when you activate the front camera button, there is an option (circled in red below) at the bottom of the screen that you can "touch" to switch the camera view.
Back at the "Surrounding Monitor Setting" ( 周辺モニタ設定) screen, touch the "Clearance Sonar " (クリアランスソナー) Sound Setting button to bring up this screen. You can configure the sound volume of the sonar either from low volume (小) to high volume (大).
Press the "Complete" (完了) button to return to the previous screen.
Back at the "Surrounding Monitor Setting" ( 周辺モニタ設定) screen, touch the "Lane Monitoring System" (レーンモニタリングシステム) button to bring up this screen
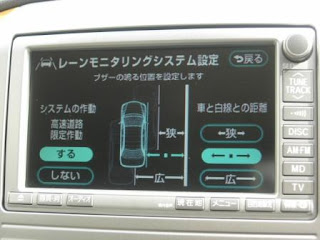
The default setting is already set with the car in the middle of the lane, with the white line on the right as the extreme right of the lane. If you prefer to have a narrower lane size, touch the "狭" button, it will move the car closer to the white line as shown below
 If you prefer a widen lane, then touch the "広" button for a wide lane size as shown below
 The lane monitoring system is turn on by default for high speed monitoring. You can turn it off by touching the "しない" button on the bottom left. This function only work when the speed is above 80km/h.
Back at the "Surrounding Monitor Setting" ( 周辺モニタ設定) screen, touch the "Back Guide Monitor" (バックガイドモニター) button to bring you to the Setting screen as shown below. The first option is the "Parallel Guide Sound Setting" (縦列ガイド音声設定) allow you to configure sound volume of the parallel parking guide as shown below.
The second option allow you to configure whether to show the initial point of your car for parallel parking shown on the monitor.
 The 3rd option allow you to configure the line type of your rear camera. Select "はい" to select the green line type as shown below
 If you choose "しない", it will use the default yellow, red and green lines for rear parking guide
Sunday, July 12, 2009
How to set up the Phone Book In Your Toyota Alphard?
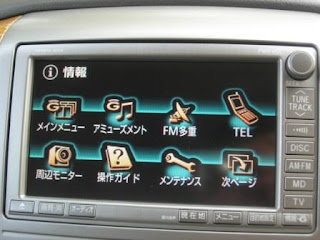 Touch the TEL button to bring up the Telephone Settings screen.
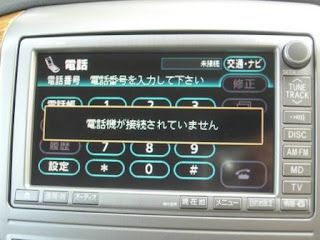 First time when you configure the Telephone Settings it will remind you that no telephone is connected. Just wait for the message to dismiss by itself.
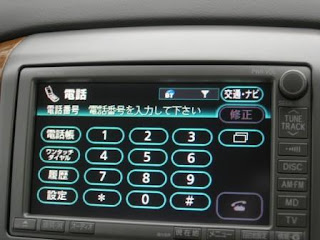 Touch the "Setting" (設定) button to bring up the Setting screen.
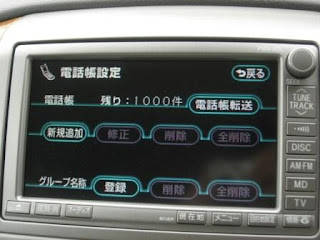
The HU phone book can stored up to a maximum of 1000 phone book. Touch the "New Entry" (新規追加) button to bring up the "Phone Book Entry" screen.
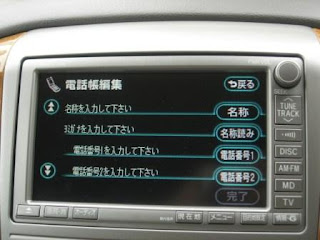 Touch the "DOWN" arrow on the left to bring you to the 2nd page as shown below.
 To store the phone book details, start with page 1 and touch the "Name" (名称) button to bring up the "Name Change" screen.
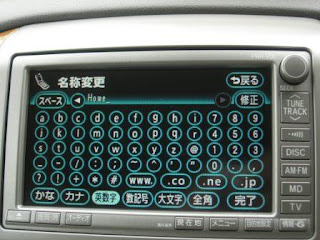
Here I have change it to "Home". Touch the "Complete" (完了) button to return to the "Phone Book Entry" screen
Touch the "Phone No 1" (電話番号 1) button to bring up the Phone Number entry screen.
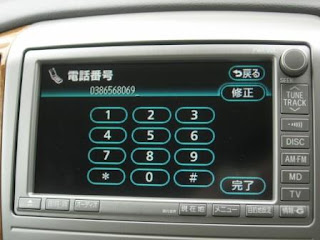 After you enter the phone number, the following screen will appear for you to select the phone type. The important option are "Mobile" (携帯), "Home" (自宅), "Work" (仕事), and "Other" (その他).
If you have another phone number, touch the "Phone No 2" (電話番号 2) button to bring up the entry screen to enter that number.
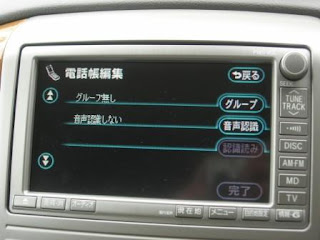
On the second page, touch the "Group" (グループ) button to select the group. I will touch on this later.
The last button is for voice recognition (音声認識) which is a cool feature but you have to program the voice recognition function to use it.
Back at the Phone Book Setting screen, you can add group to organize your phone book entries. Touch the "Register" (登録) button to select the group number, enter the name and the the icon for this group. Once you are done, back at the second page of the "Phone Book Entry" screen, you can select the group that you have defined as shown below.
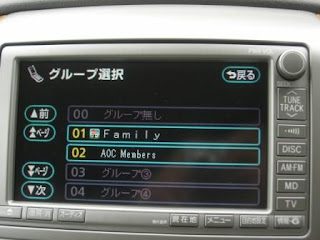 Once you have completed the phone book entries, the next time when you touch the Telephone button on the steering wheel, it will bring up this screen.
 To make a call, you can directly key in the number or touch the "Phone Book" (電話帳) button which bring up the Phone Book Screen.
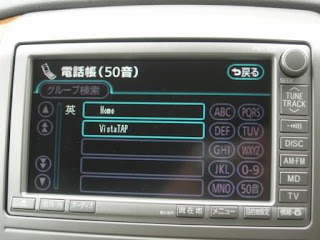 Just touch on the phone book you want to call and it will dial that number and display this screen.
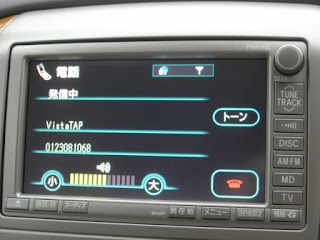 The icons on the top shows the Bluetooth status, the battery status as well as the strength of the phone signal reception.
When the call is in progress, it will shows the duration of the call as below
 You can touch the red colour "End Call" button or press the "End Call" button on the steering wheel to terminate the call.
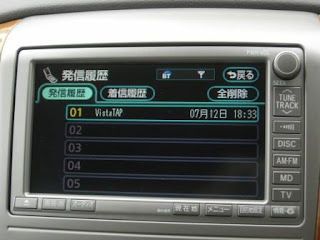
To view the history of your phone calls, touch the "Call History" (履歴) button. This will bring up the Dialled History screen as shown below.
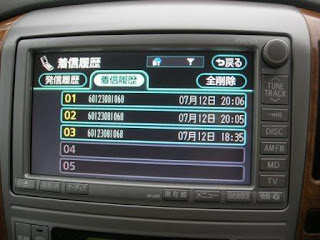
 Touch the "Received Call History" (着信履歴) tab to show the number of incoming calls.
 I hope this help you to start using the phone feature on the NFL HU.
Using the Hands Free Function In Your Toyota Alphard

When you received a call on your mobile phone, the screen will change to the incoming call screen as shown below, you can either press the "Receive Call" button on your steering wheel, or the green colour "Receive Call" button on the LCD to receive the call.
Once you touched the Receive call button, you can hear the incoming call via the speakers while you can talk to the microphone which is located on the right side of the dashboard behind the steering wheel.
The screen will display the call details as shown below

You can disconnect the conversation by touching the red colour "End Call" button or press the End Call button on the steering wheel. Or wait for the calling party to disconnect the call and a message will shown as below

In the next post, I will cover how you can enter your contact information into the Phone Book.
Friday, July 10, 2009
Bluetooth Connection to the HU In Your Toyota Alphard
Start by pressing the G-Book (情報-G) button to bring up it main menu.
 Touch the TEL button to bring up the Telephone Settings screen
 First time when you configure the Telephone Settings it will remind you that no telephone is connected. Just wait for the message to dismiss by itself.
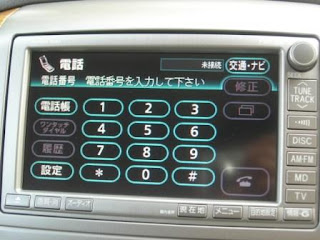 Touch the 設定 button to bring up the Setting screen
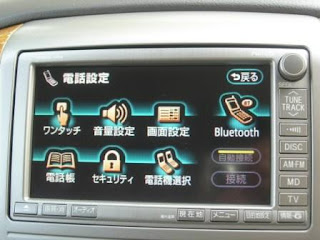 In this screen you can configure the One-Touch (ワンタツチ), sound volume setting (音量設定), screen setting (画面設定), Bluetooth setting, Telephone book (電話帳), Security (セキュリティ), and Phone unit selection (電話機選択) functions.
When you touch the Bluetooth button, it will bring up this screen
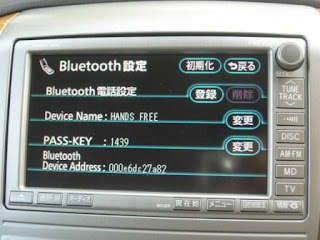 Make sure you bluetooth function on your mobile phone is activated and now touch the 登録 button and the HU will wait for you to pair your mobile phone to it as shown below
 Go to your mobile phone now to pair with the bluetooth device on the HU with your phone. The device name is by default call "HANDS FREE". Once the device is found by your bluetooth function on your mobile phone, you'll have to key in the pass-key as shown on the screen (your pass key value will be different from mine) and the bluetooth devices will be paired.
Once the pairing is successful, the screen will now display the following message 
Once the pairing is done, you'll can check the paired device by touching the "電話機選択" button to display the Phone Unit Selection page
To comfirm the detail of the paired device, you can touch on that device and it will display the pairing details as shown below. In the Bluetooth setting screen, you can also change the Device Name and Pass Key by touching the 変更 button to change it value using the Edit screen shown below
  I wrote in this post previously on how to use the Edit screen.
If you change your mobile phone and want to delete the paired device from the HU, you'll go back to the Bluetooth setting page as shown below.
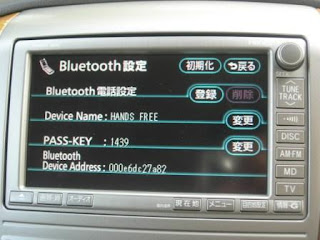 Touch the Erase (削除) button and the following screen will appear.
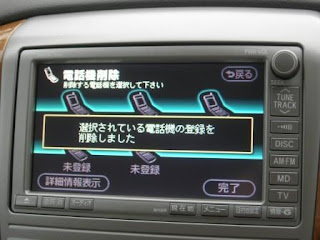
 Touch Yes (はい) to confirm delete the pairing or NO (いいえ) to abandon the operation. If you choose yes, the following screen will be shown to confirm the deletion.
In the next post I will blog on how to use the hands-free function.

