Sunday, January 16, 2011
Some Seats Configurations For Storage Space
One option is to create a large space between the rear seats, so that all the passengers will sit facing each other while the center space is reserved for the luggage. If you don’t have any passenger than you can always move the rear seats to create enough space for your luggage.
With all the seats upright and push all the way to the back, there are still about less than a feet of space behind the 3rd row seats for you to put some small objects (as shown below).
If you push the third row seats a bit to the front, you might be able to create enough space to put two pieces of luggage upright (as shown below).
In fact with this configuration, you can stack four full size golf bags for a full flight.
If you have some large luggage that requires more space, then you can push the 3rd row seats all the way to the front.
This allows you to put more luggage or other large-sized objects.
Of course, you can also lift the 3rd row seats up to create more space. I have previously covered this in this post.
If you want even a longer space to put in some long object, you can lower the backrests of the 3rd row seats.
The middle row seats backrest can be push to the front to provide more space to hold a long object. However the middle row seat backrests will be at a slightly higher position then the rear seats flatbed. If you really wanted a flat space, you can also tilt the backrest of the middle row seats to lie flat as shown below.
You’ll need to remove the head rests of the middle row seats in order for you to be able to lower the backrests completely.
Ultimately, you can create a totally flat surface for all the seats (as shown below).
I snipped this photo from the Toyota Alphard brochure I downloaded previously. I was too lazy to do this on my giant!
This configuration should allow you to put any large, long, and flat object (like a cushion etc) inside the car. In this all flat configuration, it does allow you to rest lying flat if you can’t find a hotel while on the go!
Thursday, December 17, 2009
Retrofit Doesn't Equal Original
I thought it would be a straight forward job to retrofit the missing features but I was wrong. Yes some of these features can be retrofitted locally but then it wouldn’t be the same like the original. I checked with my regular installer and it seems they are also providing the alternative solution meaning they can’t do the retrofit like those that come originally with the car.
For example if the giant that you are looking at don’t have the front camera, you can retrofit the front camera but then the installer cannot retrofit the front camera button onto the steering wheel for you. They will provide an alternative button somewhere at the dashboard in front of the steering wheel.
Similarly the installer that I frequent doesn’t have the know-how to retrofit the hands-free button onto the steering wheel. Therefore if a buyer wants to retrofit the Bluetooth function into the NFL model, he/she will have to find someone who is familiar with the wiring of the giant to do the retrofit. I have not come across anyone who can do this yet. One of my readers was quoted RM5K just to retrofit the Bluetoth function. I suspect the cost is so high because instead of retrofitting the button the installer is changing the whole steering wheel with one that comes with the button.
Another reader also highlighted that he is worried about the quality of the power door that is retrofitted locally. I don’t have experience on this but I think the worry is genuine. My understanding from my regular installer is that the retrofitting kit is fully imported from Japan. However I am not sure of the quality of the installation.
I have seen quite a lot of earlier batch giant from circa 2002-2003 doesn’t comes with any power doors. Also many dealers would like to entice their buyer with model that have twin power doors. They may retrofit the unit that don’t come the power door at the driver side to make it a twin power door model. Therefore retrofitting power door is a niche market and I believed if the installer has done enough of installation job they will get it right.
I know it is getting harder to find a unit that has all the features that you are looking for and you may be looking at the retrofitting route. As long as you have no issue with the result there are installers who can do the retrofitting job for you.
Tuesday, August 18, 2009
Three Grade of 1st Gen Toyota Alphard
So this is a (hopefully) the first of the many posts on the different specification on 1st Gen Toyota Alphard. This post start with the different grades available for the 1st Gen Toyota Alphard.
From the exterior perspective, there are really 3 different grades which are the standard grade, MS/AS and Hybrid.
The standard grade consists of MZ, MX and AX model. For these 3 grades, the design are boxy conventional minivan look and come with standard 16-inch rims. The photo below shows a pre-facelifted standard grade (on the left) and a face-lifted standard grade.
 The MS/AS grade come with aerokit in the form of a sportier bumper and larger rim to emphasize the sportier design. The photo below shows a prefacelifted MS/AS grade (on the left) and a face-lifted MS/AS grade.
 The Hybrid is very similar to the standard grade except the grille and the bumper design. Of course the Hybrid sports the Toyota Hybrid System-CVT including a 2.4-litre gasoline engine, front and rear electric motors, a continuously variable transmission (CVT), high-output hybrid battery pack and an E-Four electric four-wheel drive system. The photo below shows a pre-facelifted Hybrid grade (on the left) and a face-lifted Hybrid grade.
 I have previously covered the different between pre-facelift and face-lifted model in this post. Basically the difference are in the front headlight, rear tail lamp and the grille.
Some additional notes on 1st Gen Toyota Alphard are:
- MZ/MZ/MS comes with 3.0L engine (1MZ-FE)
- AX/AS comes with 2.4L engine (2AZ-FE)
The V and G model are supply by two different dealers. Toyota Netz supply V model while ToyoPet supply G model. I have cover the different between V and G grille in this post.
In the next several posts, I will try to explore what is offered in each of these grades.
Thursday, July 16, 2009
Other Configuration Options in the HU
When you press the G-Book (情報-G) button, it will bring you to the G-Book Main Menu as shown below.
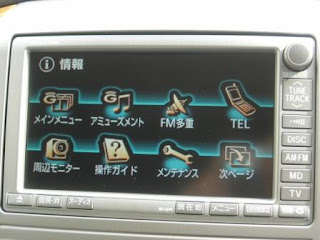
Touch the "Surrounding Monitor" ( 周辺モニタ) button to bring up this Setting screen.
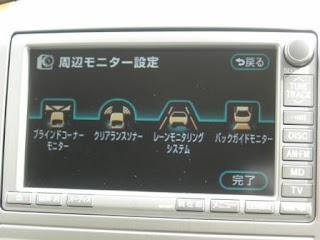 On this screen, touch the "Blind Corner Monitor" (ブラインドコーナーモニター) button to bring up this screen.
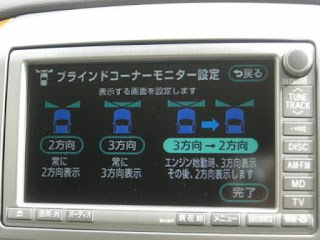 You select either 2-directions (2 方向), 3-directions (3 方向) or switchable between 2-directions and 3-directions. With the last option, when you activate the front camera button, there is an option (circled in red below) at the bottom of the screen that you can "touch" to switch the camera view.
Back at the "Surrounding Monitor Setting" ( 周辺モニタ設定) screen, touch the "Clearance Sonar " (クリアランスソナー) Sound Setting button to bring up this screen. You can configure the sound volume of the sonar either from low volume (小) to high volume (大).
Press the "Complete" (完了) button to return to the previous screen.
Back at the "Surrounding Monitor Setting" ( 周辺モニタ設定) screen, touch the "Lane Monitoring System" (レーンモニタリングシステム) button to bring up this screen
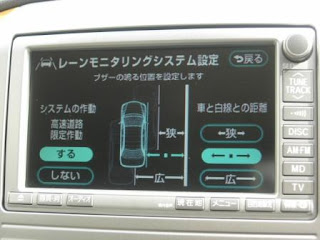
The default setting is already set with the car in the middle of the lane, with the white line on the right as the extreme right of the lane. If you prefer to have a narrower lane size, touch the "狭" button, it will move the car closer to the white line as shown below
 If you prefer a widen lane, then touch the "広" button for a wide lane size as shown below
 The lane monitoring system is turn on by default for high speed monitoring. You can turn it off by touching the "しない" button on the bottom left. This function only work when the speed is above 80km/h.
Back at the "Surrounding Monitor Setting" ( 周辺モニタ設定) screen, touch the "Back Guide Monitor" (バックガイドモニター) button to bring you to the Setting screen as shown below. The first option is the "Parallel Guide Sound Setting" (縦列ガイド音声設定) allow you to configure sound volume of the parallel parking guide as shown below.
The second option allow you to configure whether to show the initial point of your car for parallel parking shown on the monitor.
 The 3rd option allow you to configure the line type of your rear camera. Select "はい" to select the green line type as shown below
 If you choose "しない", it will use the default yellow, red and green lines for rear parking guide
Sunday, July 12, 2009
How to set up the Phone Book In Your Toyota Alphard?
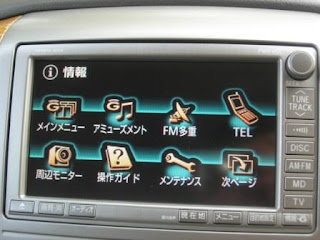 Touch the TEL button to bring up the Telephone Settings screen.
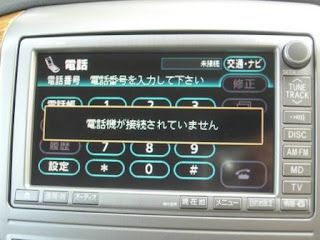 First time when you configure the Telephone Settings it will remind you that no telephone is connected. Just wait for the message to dismiss by itself.
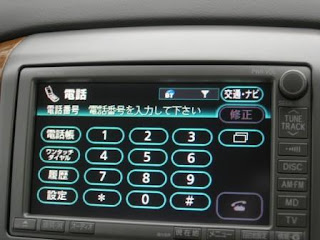 Touch the "Setting" (設定) button to bring up the Setting screen.
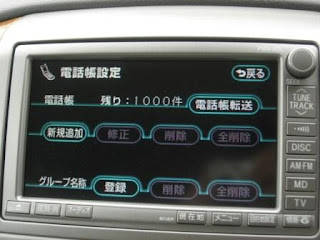
The HU phone book can stored up to a maximum of 1000 phone book. Touch the "New Entry" (新規追加) button to bring up the "Phone Book Entry" screen.
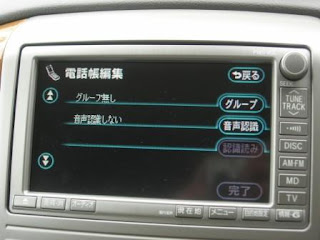
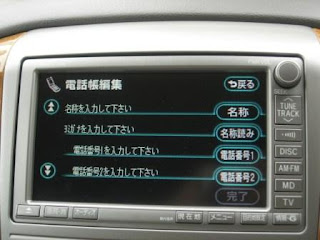 Touch the "DOWN" arrow on the left to bring you to the 2nd page as shown below.
 To store the phone book details, start with page 1 and touch the "Name" (名称) button to bring up the "Name Change" screen.
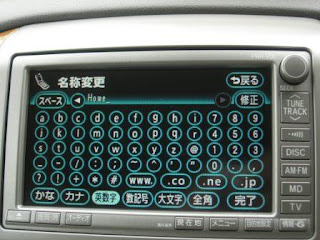
Here I have change it to "Home". Touch the "Complete" (完了) button to return to the "Phone Book Entry" screen
Touch the "Phone No 1" (電話番号 1) button to bring up the Phone Number entry screen.
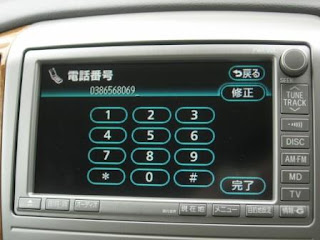 After you enter the phone number, the following screen will appear for you to select the phone type. The important option are "Mobile" (携帯), "Home" (自宅), "Work" (仕事), and "Other" (その他).
If you have another phone number, touch the "Phone No 2" (電話番号 2) button to bring up the entry screen to enter that number.
On the second page, touch the "Group" (グループ) button to select the group. I will touch on this later.
The last button is for voice recognition (音声認識) which is a cool feature but you have to program the voice recognition function to use it.
Back at the Phone Book Setting screen, you can add group to organize your phone book entries. Touch the "Register" (登録) button to select the group number, enter the name and the the icon for this group. Once you are done, back at the second page of the "Phone Book Entry" screen, you can select the group that you have defined as shown below.
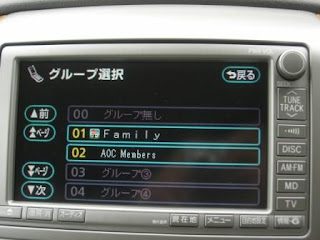 Once you have completed the phone book entries, the next time when you touch the Telephone button on the steering wheel, it will bring up this screen.
 To make a call, you can directly key in the number or touch the "Phone Book" (電話帳) button which bring up the Phone Book Screen.
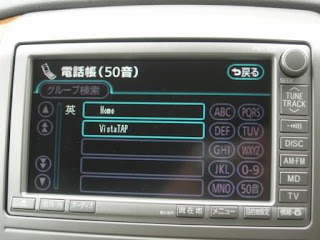 Just touch on the phone book you want to call and it will dial that number and display this screen.
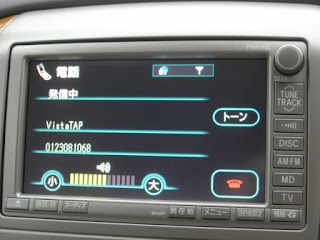 The icons on the top shows the Bluetooth status, the battery status as well as the strength of the phone signal reception.
When the call is in progress, it will shows the duration of the call as below
 You can touch the red colour "End Call" button or press the "End Call" button on the steering wheel to terminate the call.
To view the history of your phone calls, touch the "Call History" (履歴) button. This will bring up the Dialled History screen as shown below.
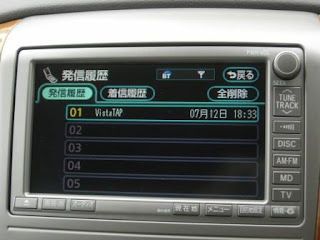 Touch the "Received Call History" (着信履歴) tab to show the number of incoming calls.
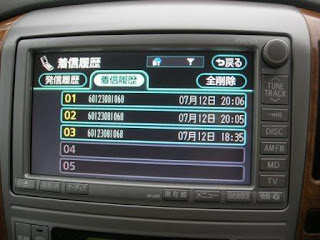 I hope this help you to start using the phone feature on the NFL HU.
Using the Hands Free Function In Your Toyota Alphard

When you received a call on your mobile phone, the screen will change to the incoming call screen as shown below, you can either press the "Receive Call" button on your steering wheel, or the green colour "Receive Call" button on the LCD to receive the call.
Once you touched the Receive call button, you can hear the incoming call via the speakers while you can talk to the microphone which is located on the right side of the dashboard behind the steering wheel.
The screen will display the call details as shown below

You can disconnect the conversation by touching the red colour "End Call" button or press the End Call button on the steering wheel. Or wait for the calling party to disconnect the call and a message will shown as below

In the next post, I will cover how you can enter your contact information into the Phone Book.
Friday, July 10, 2009
Bluetooth Connection to the HU In Your Toyota Alphard
Start by pressing the G-Book (情報-G) button to bring up it main menu.
 Touch the TEL button to bring up the Telephone Settings screen
 First time when you configure the Telephone Settings it will remind you that no telephone is connected. Just wait for the message to dismiss by itself.
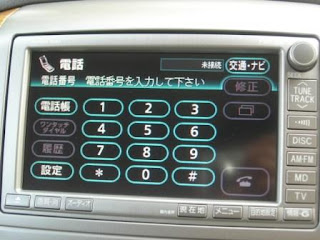 Touch the 設定 button to bring up the Setting screen
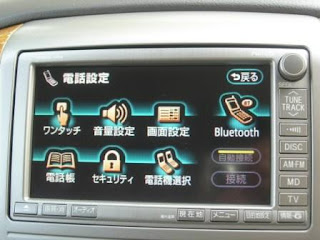 In this screen you can configure the One-Touch (ワンタツチ), sound volume setting (音量設定), screen setting (画面設定), Bluetooth setting, Telephone book (電話帳), Security (セキュリティ), and Phone unit selection (電話機選択) functions.
When you touch the Bluetooth button, it will bring up this screen
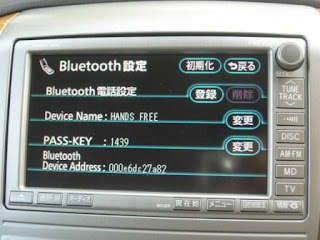 Make sure you bluetooth function on your mobile phone is activated and now touch the 登録 button and the HU will wait for you to pair your mobile phone to it as shown below
 Go to your mobile phone now to pair with the bluetooth device on the HU with your phone. The device name is by default call "HANDS FREE". Once the device is found by your bluetooth function on your mobile phone, you'll have to key in the pass-key as shown on the screen (your pass key value will be different from mine) and the bluetooth devices will be paired.
Once the pairing is successful, the screen will now display the following message 
Once the pairing is done, you'll can check the paired device by touching the "電話機選択" button to display the Phone Unit Selection page
To comfirm the detail of the paired device, you can touch on that device and it will display the pairing details as shown below. In the Bluetooth setting screen, you can also change the Device Name and Pass Key by touching the 変更 button to change it value using the Edit screen shown below
  I wrote in this post previously on how to use the Edit screen.
If you change your mobile phone and want to delete the paired device from the HU, you'll go back to the Bluetooth setting page as shown below.
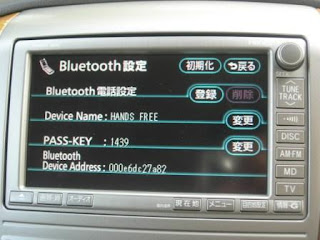 Touch the Erase (削除) button and the following screen will appear.
 Touch Yes (はい) to confirm delete the pairing or NO (いいえ) to abandon the operation. If you choose yes, the following screen will be shown to confirm the deletion.
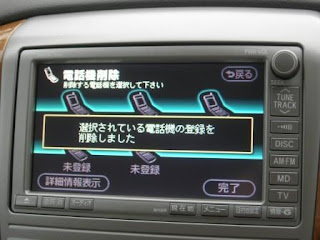
In the next post I will blog on how to use the hands-free function.


