Wednesday, December 22, 2010
My Regular Workshop
The workshop is located in Kampung Sungai Kayu Ara, Petaling Jaya. To get there, you drive along Lebuhraya Sprint heading towards the Damansara toll. Just before the toll, there is a ramp on the left that leads to Bandar Utama. Keep left and follow the road leading to that ramp. After you pass the BHP petrol station, on the left is a used car dealer called Petra Motor. When you see the Petra Motor signboard, immediately turn in to a slip road parallel to the main road. Go up the slip road and you’ll see a row of shops on your left.
The workshop I regularly visited is called Pusat Servis Kereta Hup Seng. They occupied the last two shop lots. If you are not familiar with that area, the Google Earth coordinate are latitude 3° 7'59.07"N and longitude 101°36'30.23"E. Or click this link to see the location in Google Map.
This is the entrance to the row of shops.
Just becareful as you pass through the tight entrance.
This is the view of the shop lots.
This is the workshop that I send my giant for service.
Yes, that white car on the hoist is my giant!
Hup Seng is an old fashion workshop that service all sort of vehicles. The owner is called Wong and he has been operating from this workshop for a long time. Beside his regular customers, he also provide pre-delivery maintenance service for imported used cars for another used car dealer. He is very familiar with servicing of imported used cars, including Toyota Alphard.
I am not promoting this workshop nor do I have any business relationship with the owner. I am just their regular customer for the last 15 years so they do allow me to bring my own spare parts and they charge me a nominal sum for services. If you do no want to source for your own spare parts, you can get from the workshop.
As usual, I want to put the disclaimer here. Readers who are interested to send their car to this workshop do so at their own risk.
If you need to contact them, call 03-77291029.
Tuesday, December 7, 2010
My Fuel Consumption After Service and Battery Change
The last service was done around March this year so it is high time to service again. I bought my own engine oil (Penzoil 5W-30 semi-synthetic) and oil filter (friom Wing Hin) and did the service at my regular workshop. All in it cost me RM112 only.
Also I decided to change the battery as I think it is getting weak due to the fact that it has not been recharged regularly as the car has not been driven that often.
The original battery came with the car probably has been used since it left the factory. I think the battery can still last quite a bit. However, since I am going on a long journey and driving in kiasu land I think it is safer to have a new battery and for the peace of mind.
I was pleasantly surprised with the mileage that I got from these two changes for this journey. I drove down to kiasu land, drove around the city for 3 days and then head back to KL. I was able to get 585km with a full tank of RON 95 petrol. That’s gave me approximately fuel consumption of 11km/litre. It seems the new engine oil and the new battery help to achieve such good fuel consumption.
I did another full tank refill at Pagoh, drove back to KL and then drove around the city and managed to clocked 530km. This is equivalent to approximately 9.0km/litre. I expect it to be lower due to the congested route I had to go through to my new office in PJ. I hope that I can continue to maintain this kind of fuel consumption and I will continue to monitor it regularly.
If your giant fuel consumption is deteriorating recently maybe it is time for you to look at these two items.
Saturday, March 20, 2010
Update Maintenance Schedule for Toyota Alphard
He has graciously provided an updated copy to me and I would like to share with everyone.
Click the link below to download the updated schedule.
Maintenance Schedule for Toyota Alphard
The schedule is now in Excel spreadsheet format. There are a "Status" column for each maintenance interval that you can tick off each of the maintenance item after every service.
Let me know if this maintenance schedule is helpful to you.
If any owner of 1MZ-FE has a maintenance schedule that he/she would to share with other, you can sent it to me at askds@live.com.
As I continue to learn more about the 2AZ-FE engine, I found the Haynes Repair Manual for Toyota Camry which share the same engine with our giant. If you want to learn more on how to maintain your giant, you might want to get a copy through link above.
Hope this help.
Friday, March 5, 2010
Maintenance Schedule for Toyota Alphard
You can get the schedule from this link.
Since I didn't purchased all the parts listed in the schedule before I cannot confirm all the parts numbers. I can only confirmed that the part numbers for oil filter (90915-YZZE2) and air filter element (17801-28010) as I have bought them personnally.
Since a reader also asked me where can he get original Toyota spare parts, I thought of listing the two that I know of in this post.
If you are looking for original Toyota spare parts for your giant, you can get it from either:
Wing Hin Auto Supplies Sdn Bhd
Wisma Wing Hin
No 27-5, Jalan Loke Yew,
55200 Kuala Lumpur
Tel: 603-9221 8867 Fax: 603-9221 9217
E-mail: spareparts@winghin.com
or
ST AUTO SPARES SDN. BHD.
No. 97, Jalan Ipoh,
51200 Kuala Lumpur, Malaysia.
Tel: 603-4042-1669 Fax: 603-4042-2782
E-mail: parts@stauto.com.my
Website: http://www.stauto.com.my/
I am not related to either of these companies. I just happen to have bought original spare parts from them before and they are two of the largest Toyota spare parts dealers in Malaysia.
Hope this help
Wednesday, February 24, 2010
Disconnect The Battery If You Don't Plan To Drive Your Toyota Alphard For A Long Time
So when I try to start the giant today it just won't start. I can hear rattling sound from the engine bay but it just won't kick start the car. The immobiliser indicator on the stachometer started to flash once I pull out the key so I initially thought it has something to do with the immobiliser. However since the flashing light goes off once the key is inserted again, it is obvious that the immobiliser is working properly.
Since I ICEd my car so I have one of those volt meter display installed next to the battery. It was showing around 11.5v which is just slightly less than the required voltage to kickstart the engine. Given that the giant has a large alternator it really need all the power from the battery to start the engine. Interestingly that at this voltage the power door still can be operated (I wanted to test it to see how bad the battery was). Looks like the power door motor don't required so much juice to drive the power door.
Also the IES alarm system I installed doesn't seems to be affected. It continue to operate without any hitch. This is different from other alarm system where the alarm will make annoying buzzing sound when it detected the battery is weak. I think the reason being that this alarm comes with a battery pack that continue to power the system even though the car battery is weak.
Anyway I borrowed a jumper cable from a nearby workshop and jump-started the engine. After driving the giant for a while now the battery is re-charged and maintain a voltage above 12.5v which is sufficient to start the engine. Once the engine is started the voltage will fluctuate between 13.9v to 14.1v.
I must remind myself to frequently start the engine every other day even though I haven't been driving my giant lately. Now you know why every morning the dealers will ask their worker to start the engine of every cars they have on display in the showroom. This is to ensure that the battery are probably charged while the car is on display.
Friday, December 11, 2009
Location of Fuses in Toyota Alphard
There are several fuse boxes installed in a Toyota Alphard. The main fuse boxes are located in the engine compartment. The location of the fuse boxes in the engine compartment is slight different between the 2.4L and 3.0L model. On the 2.4L 2AZ-FE engine model, it is located on the right side of the engine compartment as shown in the photo below.
 On the 3.0L 1MZ-FE model, it is located in the middle section on top of the engine.
There is another smaller fuse box below the larger one as shown in the photo below.

This is for the 2.4L model. The 3.0L model has the same smaller fuse box in front of the radiator.
There are two more fuse boxes located under the dashboard, one is on the driver side as shown in the photo below.

You will have to unhook the smaller coin box from the dashboard before you can have access to the fuse location which is located deep inside the dashboard.
The other is located behind the glovebox at the passenger side.

Again you will have to unhook the lower glovebook before you can access to the fuses located next to the aircon filter box.
Now that you have located each of the fuse boxes, you’ll need to identify each of the fuses within the fuse box to ascertain which one controls which component. The following tables show the fuel name, the ampere and the description of each fuse. The diagrams before each table list the location of the fuses within the fuse box.
Main fuse box (in engine compartment)
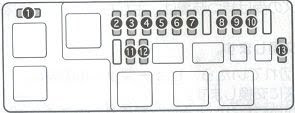
| Fuse Name | Ampere | Description | |
| 1 | SLC | 7.5A | VSC |
| 2 | H-LP (RH) | 15A | Headlamp high beam (RH) |
| 3 | H-LP (LH) | 15A | Headlamp high beam (LH) |
| 4 | H-LP (RL) | 15A | Headlamp (RH) |
| 5 | H-LP (LL) | 15A | Headlamp (LH) |
| 6 | RAD NO.3 | 25A | Audio |
| 7 | HAZ-HORN | 20A | Hazard Light, Indicator Lights, Horn |
| 8 | EFI | 15A | Engine Computer |
| 9 | RAD NO.1 | 15A | Audio |
| 10 | ECU-B | 10A | Meter, ABS, Power Window |
| 11 | SPARE | 15A | Spare fuse |
| 12 | SPARE | 7.5A | Spare fuse |
| 13 | ETCS | 10A | Electronic Toll Collection System |
Secondary fuse box (in engine compartment)

| Fuse Name | Ampere | Description | |
| 1 | ABS | 25A | ABS |
| 2 | ALT-S | 5A | Alternator |
| 3 | DOOR NO.1 | 30A | Door Lock |
Fuse Box at driver side

| Fuse Name | Ampere | Description | |
| 1 | STOP | 15A | Ingition Light |
| 2 | GAUGE | 10A | Engine Computer, Power Slide Door, Clearing Sonar & Park Sonar |
| 3 | CURTAIN- RH | 15A | Electric Curtain - Right Hand Side |
| 4 | CURTAIN LH& BK | 25A | Electric Curtain - Left Hand Side and Rear |
| 5 | MIR HTR | 10A | Mirror Heater |
| 6 | CURTAIN | 5A | Electric Curtain |
| 7 | WIP | 25A | Wiper |
| 8 | AC 100V | 15A | Accessory Console Center |
| 9 | P/W RH | 25A | Power Window |
| 10 | ODB-II | 7.5A | Dignostic Connector |
Fuse Box at Passenger Side

| Fuse Name | Ampere | Description | |
| 1 | S/ROOF | 30A | Moon-roof |
| 2 | DEF | 30A | Rear window defrost |
| 3 | FOG | 15A | Front Fog Light |
| 4 | DOME2 | 7.5A | Room Lights |
| 5 | VSC | 7.5A | VSC |
| 6 | P/SEAT | 30A | Power Seats (3.0L only) |
| 7 | BACK DOOR | 30A | Power Boot |
| 8 | AM1 | 7.5A | Engine Switch |
| 9 | RR FOG | 10A | Rear Fog Lamp |
| 10 | P/W LH | 30A | Power Windows - LH |
| 11 | DOOR | 30A | Door Lock |
| 12 | DOME | 7.5A | Room Lights |
| 13 | TAIL | 10A | Rear Tail lights |
| 14 | PANEL | 10A | Switch illuminator, Aircon illuminator |
| 15 | ECU-IG | 10A | ABS, Power Slide Door, Cruise Control |
| 16 | RR WIP | 10A | Rear Wiper |
| 17 | A/C | 10A | Aircon, Audio |
| 18 | DEICER | 30A | Front Wiper Deicer |
| 19 | SLOPE | 7.5A | - |
| 20 | SEAT HTA | 10A | Seat Heater |
| 21 | INJ | 15A | Engine Computer |
| 22 | UGN | 10A | Engine Computer, SRS Airbag |
| 23 | MET IGN | 7.5A | Meter |
| 24 | ECU ACC | 10A | Shift lock, Door mirror, Audio |
| 25 | CIG | 15A | Cigarette Lighter |
| 26 | P/POINT | 15A | Accessory socket |
Please note that the above write up cover what I know on the fuse locations for the new facelift model of 1st generation Toyota Alphard. Other model may have different fuse locations.
PS. Phew. This is the longest time I ever took to write a post because the formatting I have do for the table HTML code outside of the blogging platform.
PPS. A reader was asking where exactly is the fuse box on the passenger side. I am away at the moment so I can only attached a schematic diagram as a reference. I will take a better picture of it location when I am back.
Saturday, November 28, 2009
Toyota Alphard Power Door Problem?
The step to investigate this problem involves the following sequences.
If you are handy in troubleshooting yourself, first check the fuse then check if there is power at the motor when the buttons are operated, then check for power at the buttons, then for power at the fuse. Look closely at the wires at and near the motor and the button and as far as you can follow them, look for obvious problems, loose connections, look for frays where the wires take a bend or go through a hole or are near anything moving. The problem can have many possible causes such as a poor ground, loose connection, frayed wire, bad switch, blown fuse, faulty relay, blown motor, or possibly even a problem with the mechanical aspect that opens the door.
Phew, that's a mouthful.
Well that's the steps the service personnel would have to go through. We mortal just operating the doors probably don't even know how to start.
If you do not want to handle the thorough investigation stated above, then try a reset. The power sliding door can be reset simply by disconnecting the battery, reconnect the terminal (which reset the power door), turn on the power door button and press the open/close button. If this does not fix the problem then you have to look at other area like door’s motor, cable etc. A worn battery might not deliver enough power to the driving motor so you might want to check the condition of the battery when you have a power door problem. At the minimum change to a 60Amp or higher battery, if you have other equipment like ICE that drain you battery.
If all else fail, please check with your mechanic :)
Saturday, August 15, 2009
Maintenance Reminders In The HU on Toyota Alphard
Start by pressing the G-Book (情報-G) button to bring up it main menu.
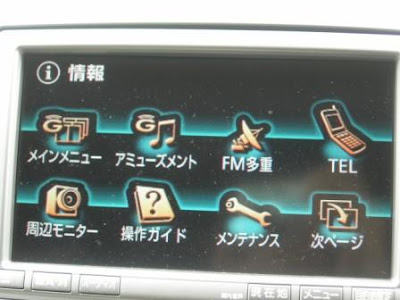
Touch the Maintenance (メンテナンス) button to bring up the Maintenance Settings screen.
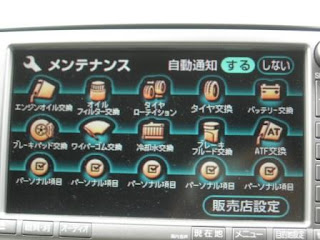 On this screen, you find the following maintenance items (from top left to bottom right of the first two rows):
- Engine Oil Change (エンジンオイル交換)
- Oil Filter Change (オイルフィルターを交換)
- Tire Rotation (タイヤローテーション)
- Tire Change (タイヤ交換)
- Battery Change (バッテリー交換)
- Brake Pad Change (ブレーキパッド交換)
- Wiper Comb Change (ワイパーコム交換)
- Coolant Water Change (冷却水交換)
- Brake Fluid Change (ブレーキフルート交換)
- ATF Change (ATF交換)
To enter the reminder information, press any of the first 0 button above and you'll get a screen similar to the one shown below
Touch the Notification Date (お知らせ日) button which will bring up this screen for you to enter the date in Year/Month/Day format (Japanese format).
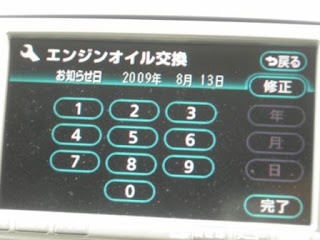
Touch the Complete (完了) button to return to the previous screen.
Touch the Notification Distance (お知らせ距離) button to enter the mileage when this item was changed and then lastly enter the mileage from when the next change should be made.
For some items, you'll only enter the date while other you will have to enter all 3 values.
Touch the Setting Complete (設定完了) button and it will ask you to confirm the action, touch the Yes (はい) button to confirm it.
When you touch any one of the 5 Personal Item (パーソナル項目) button, you will be brought to this screen.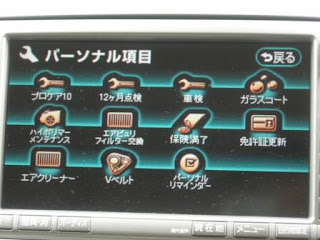
On this screen, you can enter reminder value for the following personal items:
- Professional Care 10 (プロケア10)
- 12 months inspection (12ヶ月点検)
- Car Inspection (車検)
- Coated Glass (ガラスコート)
- High Polymer Maintenance (ハイポリマー メンテナンス) ?
- Air filter change (エアフィルター交換)
- Insurance Renewal (保険満了)
- Driving Permit Renewal (免許証更新)
- Air Cleaner (エアクリーナー)
- V-belt (Vベルト)
- Personal Reminder (パーソナル リマインダ)
When you touch on any of the button it will bring up the same reminder screen as the standard maintenance item shown above for you to enter the value.
Back at the Maintenance screen, remember to touch on the Do (する) button next to words Auto Reminder (自動通知) at the top right of the screen to enable the automatic reminder.
This will ensure that you'll be reminded on those item(s) that you have entered maintenance information when the mileage for that reminder has been reached. When the mileage for a particular mainteannce has been reached or the date has been reached, a message will pop-up in the LCD to remind you.
It is interesting to note that the Japanese has thought of all these for their car owners.
Saturday, July 18, 2009
Replace Air Filter Element in Your Toyota Alpha
Open the hood and you'll see the air filter box on top of the engine as shown below.
 In front of the air filter box on the right side is the air tube that channel cold air into the air filter box. Loosen the clip holding the air tube to disconnect the tube from the air filter box.
On the left side of the air filter box are two clips that holds the air filter box cover. Loosen them by flipping the front clip outward and then unhook the rear clip as shown below. Now you can completely remove the air filter box cover to access to the air filter element. In the photo below is my KNN replacement air filter element.
 The air filter element can only be fitted into the air filter box in one direction (with the label facing the inner side of the air filter box) as shown below.
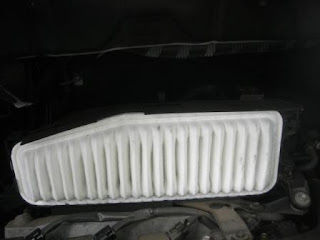 Now just replace the air filter box cover and ensures all the clips are securely fasten.
Enjoy your new air filter element.
Sunday, July 12, 2009
How to replace the aircon filter?
Open the lower glove box and pushes both edge (the circled area) of the glove box to release it from the dashboard.
 Look at the left hand side of the glove box now. There is another holder that hold the glove box from falling off.
 Squeezed the "securing" plug (as circled) to release it from holder and the glove box can now be completely remove from the dashboard as shown below.
Now you can see the aircond filter tray as shown below.


