Thursday, April 7, 2011
Burn a Playable DVD and Play on the HU
I was driving home today and was stucked in a jam so I fiddle with the HU. I usually listen to the songs I had in the HDD while driving. But today it suddenly occurs to me that I can probably use the DVD player to (at least) listen to some of the video recordings related to my work. Even if I can't watch the video I can still listen to the audio. Since I usually get stuck in a jam on the way to work and going home, maybe I should find a way to do that.
A reader has previously asked me the same question too. He burned some video files and try to play it on the giant's HU DVD player and couldn't get it to work. He tried multiple formats like VCD, DVD, MP4, AVI, RMVB etc but none seems to work.
So when I reached home I set out to do some online research to understand what format is supported by the giant HU's DVD player. I had a look in the manual and found that it does support DVD Video. So I read up a bit about DVD Video on the Internet trying to see if I can find some program that can do this easily. Well it seems someone already have found a simple way to convert videos into a playable DVD.
Instead of showing you steps-by-steps here I think it is easier for you to check out this page.
I choose NTSC format instead of PAL as that's the default format the giant HU DVD player support.
So I took some vidoe files I collected in my PC and drag them into the DVD Flick software. As mentioned in that post, the authoring of the DVD does take times. I tried to squeezed as much videos as I can into a 4.7GB single layer DVD disc and it took almost two hours for the authoring to complete! Also the program is very CPU intensive and it hover around the 100% utilization mark on my C2D E6750 2.66Mhz machine.
I chose to create an ISO file instead of burning it directly to the DVD. This allowed me to walk away from the PC during the authoring and when it is done I just burn the ISO file into a DVD.
After I burn the video files into a DVD+R with my favourite ISO tool, PowerISO, I tried it on my giant and it seems to play the DVD fine.
The DVD Flick software let you choose a pre-define menu page.
It also allow you the choose each video as a menu item. However doing it with the touch screen on the HU is quite a chore. I just decided to let it run on it own since my main aim is to listen to the audio only.
The DVDFlick program mentioned in the original article is for Windows platform only. If you have a Mac, try this page instead.
Have fun burning your own playable DVD.
Cheers
Sunday, January 23, 2011
More on Bluetooth Function
However when I tried to add a new device on the Bluetooth screen that button is gray-out. I was thinking is that something wrong with my Bluetooth function? After fiddling with the Bluetooth options for a while then only I realized the hands-free function can only be paired with a maximum of 5 Bluetooth-enabled phones. I have previously been testing and showing the Bluetooth function to other AOC members so I have maxed out the pairing.
I deleted all the old phones entry from the Bluetooth option screen and I can now add my Android phone. I also tried pairing my wife’s iPhone 4 with the HU without any problem. I was thinking how would the HU know which phone to pair with if both my wife and I turn on the Bluetooth function in our phone at the same time. Well the HU keep track of the last paired and connected Bluetooth phone. The next time when that same phone is found, it will be paired and connected. So if you find that you Bluetooth is not pairing with you own phone for whatever reason, you might have change the preference the last time you fiddle with the Bluetooth screen.
Given that the iPhone can pair with the HU, then the next question is whether an iPad can be paired with the HU and be use to control the HU function. Theoretically I don’t think it work. However I don’t have an iPad so I would need to “borrow” one to try it out.
An interesting discovery I had is that both the Android and iPhone can be paired with the HU but they can’t be paired with each other. Both are based on Bluetooth 2.1 with Enhanced Data Rate technology but somehow during the authentication, the passkey entry screen is not prompted so there is no way for the pairing to complete.
I met an old friend at the driving range last Friday and we also tried to pair his Samsung Galaxy S with my HTC Desire. Still we can’t get the pairing to work. I have been doing a bit of research and I think there are many other HTC Desire owners are also having the same problem. I haven’t found an answer to this problem yet. I guess I will have to wait for the next firmware update from HTC to see if this problem is resolved.
Monday, January 17, 2011
The Calendar Time In the NFL HU
As I scrolled through the HU screen, I just can’t find anywhere to configure the time for the HU. Then it occurred to me that the HU is probably are getting it time through some kind of sync over the air. The only way for the HU to sync with outside is through the GPS function. Even as I go through the GPS option screens I still can’t find any place to set the time.
It took me quite a while to figure out that the HU might be getting it time from the hidden GPS function in the diagnostic menu. Just as I thought I can see that there is a button to set the date and time in the hidden GPS function.
When you press the Set Date Time button, it will show you the following screen. From here you can set the date and time accordingly.
However I didn’t set it to the local time yet as I was wondering if the GPS is continuously syncing with some satellites to get the date and time. Is this how the HU is able to announce the day and date every time you start the car for the first time in any day? The time in the HU calendar function is actually the current Japan time which is one hour ahead of our time. I believed if I were to start the car after 11pm every night here, the HU might actually announce the next day. I will have to try this out to see if this is the case.
I will also need to spend some time researching on how GPS work before I can confirm if the GPS actually work in the giant.
Saturday, August 15, 2009
Maintenance Reminders In The HU on Toyota Alphard
Start by pressing the G-Book (情報-G) button to bring up it main menu.
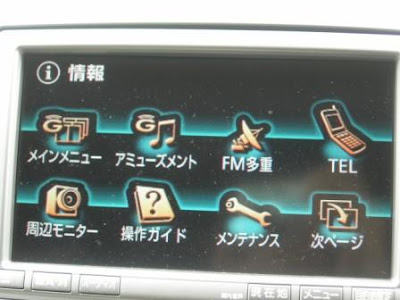
Touch the Maintenance (メンテナンス) button to bring up the Maintenance Settings screen.
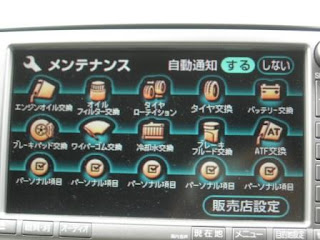 On this screen, you find the following maintenance items (from top left to bottom right of the first two rows):
- Engine Oil Change (エンジンオイル交換)
- Oil Filter Change (オイルフィルターを交換)
- Tire Rotation (タイヤローテーション)
- Tire Change (タイヤ交換)
- Battery Change (バッテリー交換)
- Brake Pad Change (ブレーキパッド交換)
- Wiper Comb Change (ワイパーコム交換)
- Coolant Water Change (冷却水交換)
- Brake Fluid Change (ブレーキフルート交換)
- ATF Change (ATF交換)
To enter the reminder information, press any of the first 0 button above and you'll get a screen similar to the one shown below
Touch the Notification Date (お知らせ日) button which will bring up this screen for you to enter the date in Year/Month/Day format (Japanese format).
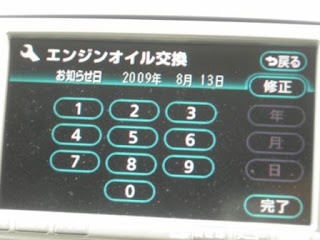
Touch the Complete (完了) button to return to the previous screen.
Touch the Notification Distance (お知らせ距離) button to enter the mileage when this item was changed and then lastly enter the mileage from when the next change should be made.
For some items, you'll only enter the date while other you will have to enter all 3 values.
Touch the Setting Complete (設定完了) button and it will ask you to confirm the action, touch the Yes (はい) button to confirm it.
When you touch any one of the 5 Personal Item (パーソナル項目) button, you will be brought to this screen.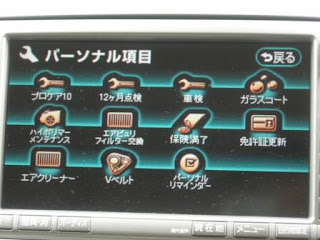
On this screen, you can enter reminder value for the following personal items:
- Professional Care 10 (プロケア10)
- 12 months inspection (12ヶ月点検)
- Car Inspection (車検)
- Coated Glass (ガラスコート)
- High Polymer Maintenance (ハイポリマー メンテナンス) ?
- Air filter change (エアフィルター交換)
- Insurance Renewal (保険満了)
- Driving Permit Renewal (免許証更新)
- Air Cleaner (エアクリーナー)
- V-belt (Vベルト)
- Personal Reminder (パーソナル リマインダ)
When you touch on any of the button it will bring up the same reminder screen as the standard maintenance item shown above for you to enter the value.
Back at the Maintenance screen, remember to touch on the Do (する) button next to words Auto Reminder (自動通知) at the top right of the screen to enable the automatic reminder.
This will ensure that you'll be reminded on those item(s) that you have entered maintenance information when the mileage for that reminder has been reached. When the mileage for a particular mainteannce has been reached or the date has been reached, a message will pop-up in the LCD to remind you.
It is interesting to note that the Japanese has thought of all these for their car owners.
Thursday, July 16, 2009
Other Configuration Options in the HU
When you press the G-Book (情報-G) button, it will bring you to the G-Book Main Menu as shown below.
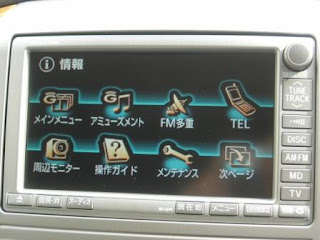
Touch the "Surrounding Monitor" ( 周辺モニタ) button to bring up this Setting screen.
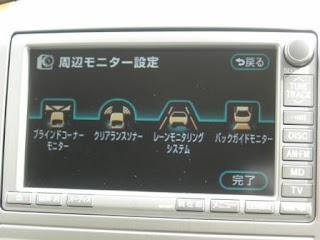 On this screen, touch the "Blind Corner Monitor" (ブラインドコーナーモニター) button to bring up this screen.
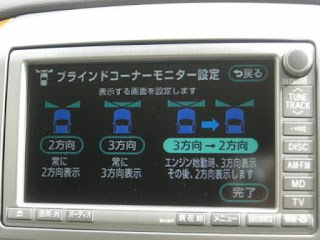 You select either 2-directions (2 方向), 3-directions (3 方向) or switchable between 2-directions and 3-directions. With the last option, when you activate the front camera button, there is an option (circled in red below) at the bottom of the screen that you can "touch" to switch the camera view.
Back at the "Surrounding Monitor Setting" ( 周辺モニタ設定) screen, touch the "Clearance Sonar " (クリアランスソナー) Sound Setting button to bring up this screen. You can configure the sound volume of the sonar either from low volume (小) to high volume (大).
Press the "Complete" (完了) button to return to the previous screen.
Back at the "Surrounding Monitor Setting" ( 周辺モニタ設定) screen, touch the "Lane Monitoring System" (レーンモニタリングシステム) button to bring up this screen
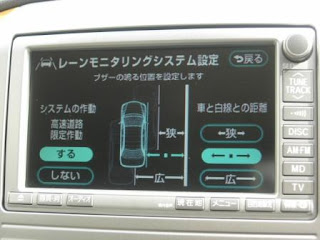
The default setting is already set with the car in the middle of the lane, with the white line on the right as the extreme right of the lane. If you prefer to have a narrower lane size, touch the "狭" button, it will move the car closer to the white line as shown below
 If you prefer a widen lane, then touch the "広" button for a wide lane size as shown below
 The lane monitoring system is turn on by default for high speed monitoring. You can turn it off by touching the "しない" button on the bottom left. This function only work when the speed is above 80km/h.
Back at the "Surrounding Monitor Setting" ( 周辺モニタ設定) screen, touch the "Back Guide Monitor" (バックガイドモニター) button to bring you to the Setting screen as shown below. The first option is the "Parallel Guide Sound Setting" (縦列ガイド音声設定) allow you to configure sound volume of the parallel parking guide as shown below.
The second option allow you to configure whether to show the initial point of your car for parallel parking shown on the monitor.
 The 3rd option allow you to configure the line type of your rear camera. Select "はい" to select the green line type as shown below
 If you choose "しない", it will use the default yellow, red and green lines for rear parking guide
Sunday, July 12, 2009
How to set up the Phone Book In Your Toyota Alphard?
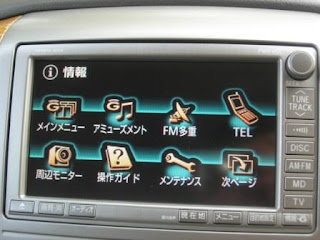 Touch the TEL button to bring up the Telephone Settings screen.
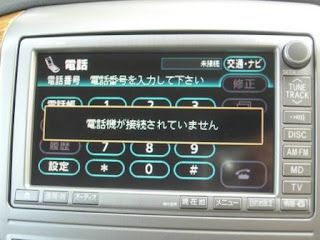 First time when you configure the Telephone Settings it will remind you that no telephone is connected. Just wait for the message to dismiss by itself.
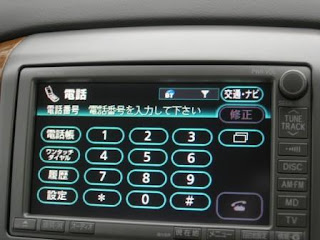 Touch the "Setting" (設定) button to bring up the Setting screen.
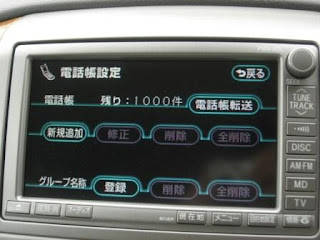
The HU phone book can stored up to a maximum of 1000 phone book. Touch the "New Entry" (新規追加) button to bring up the "Phone Book Entry" screen.
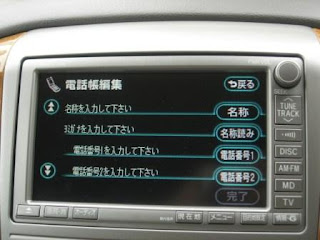 Touch the "DOWN" arrow on the left to bring you to the 2nd page as shown below.
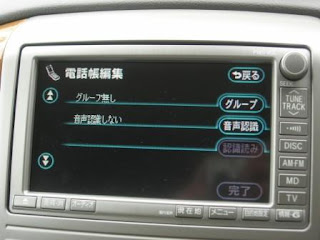 To store the phone book details, start with page 1 and touch the "Name" (名称) button to bring up the "Name Change" screen.
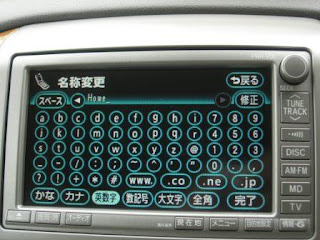
Here I have change it to "Home". Touch the "Complete" (完了) button to return to the "Phone Book Entry" screen
Touch the "Phone No 1" (電話番号 1) button to bring up the Phone Number entry screen.
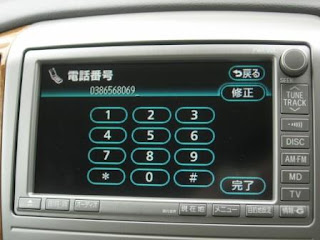 After you enter the phone number, the following screen will appear for you to select the phone type. The important option are "Mobile" (携帯), "Home" (自宅), "Work" (仕事), and "Other" (その他).
If you have another phone number, touch the "Phone No 2" (電話番号 2) button to bring up the entry screen to enter that number.
On the second page, touch the "Group" (グループ) button to select the group. I will touch on this later.
The last button is for voice recognition (音声認識) which is a cool feature but you have to program the voice recognition function to use it.
Back at the Phone Book Setting screen, you can add group to organize your phone book entries. Touch the "Register" (登録) button to select the group number, enter the name and the the icon for this group. Once you are done, back at the second page of the "Phone Book Entry" screen, you can select the group that you have defined as shown below.
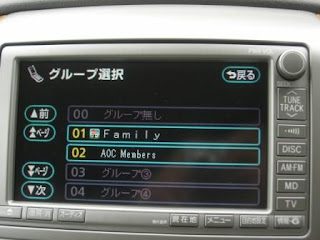 Once you have completed the phone book entries, the next time when you touch the Telephone button on the steering wheel, it will bring up this screen.
 To make a call, you can directly key in the number or touch the "Phone Book" (電話帳) button which bring up the Phone Book Screen.
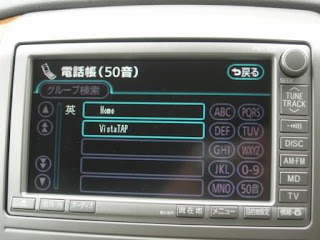 Just touch on the phone book you want to call and it will dial that number and display this screen.
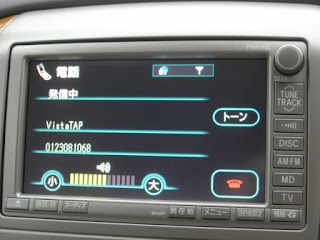 The icons on the top shows the Bluetooth status, the battery status as well as the strength of the phone signal reception.
When the call is in progress, it will shows the duration of the call as below
 You can touch the red colour "End Call" button or press the "End Call" button on the steering wheel to terminate the call.
To view the history of your phone calls, touch the "Call History" (履歴) button. This will bring up the Dialled History screen as shown below.
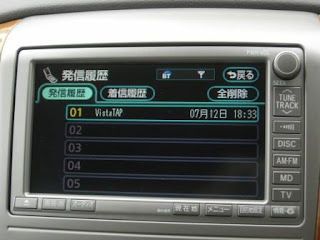 Touch the "Received Call History" (着信履歴) tab to show the number of incoming calls.
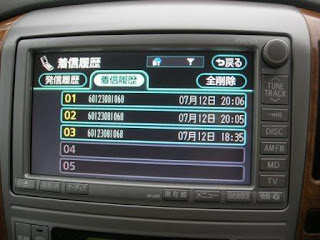 I hope this help you to start using the phone feature on the NFL HU.
Using the Hands Free Function In Your Toyota Alphard

When you received a call on your mobile phone, the screen will change to the incoming call screen as shown below, you can either press the "Receive Call" button on your steering wheel, or the green colour "Receive Call" button on the LCD to receive the call.
Once you touched the Receive call button, you can hear the incoming call via the speakers while you can talk to the microphone which is located on the right side of the dashboard behind the steering wheel.
The screen will display the call details as shown below

You can disconnect the conversation by touching the red colour "End Call" button or press the End Call button on the steering wheel. Or wait for the calling party to disconnect the call and a message will shown as below

In the next post, I will cover how you can enter your contact information into the Phone Book.
Friday, July 10, 2009
Bluetooth Connection to the HU In Your Toyota Alphard
Start by pressing the G-Book (情報-G) button to bring up it main menu.
 Touch the TEL button to bring up the Telephone Settings screen
 First time when you configure the Telephone Settings it will remind you that no telephone is connected. Just wait for the message to dismiss by itself.
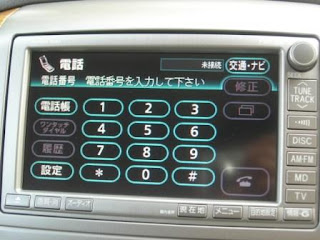 Touch the 設定 button to bring up the Setting screen
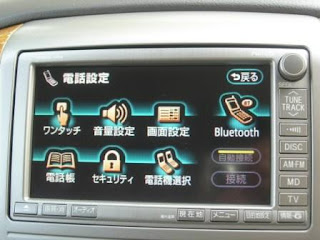 In this screen you can configure the One-Touch (ワンタツチ), sound volume setting (音量設定), screen setting (画面設定), Bluetooth setting, Telephone book (電話帳), Security (セキュリティ), and Phone unit selection (電話機選択) functions.
When you touch the Bluetooth button, it will bring up this screen
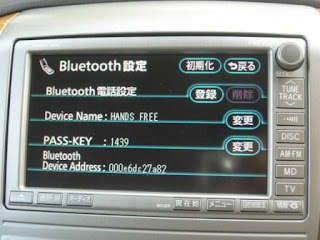 Make sure you bluetooth function on your mobile phone is activated and now touch the 登録 button and the HU will wait for you to pair your mobile phone to it as shown below
 Go to your mobile phone now to pair with the bluetooth device on the HU with your phone. The device name is by default call "HANDS FREE". Once the device is found by your bluetooth function on your mobile phone, you'll have to key in the pass-key as shown on the screen (your pass key value will be different from mine) and the bluetooth devices will be paired.
Once the pairing is successful, the screen will now display the following message 
Once the pairing is done, you'll can check the paired device by touching the "電話機選択" button to display the Phone Unit Selection page
To comfirm the detail of the paired device, you can touch on that device and it will display the pairing details as shown below. In the Bluetooth setting screen, you can also change the Device Name and Pass Key by touching the 変更 button to change it value using the Edit screen shown below
  I wrote in this post previously on how to use the Edit screen.
If you change your mobile phone and want to delete the paired device from the HU, you'll go back to the Bluetooth setting page as shown below.
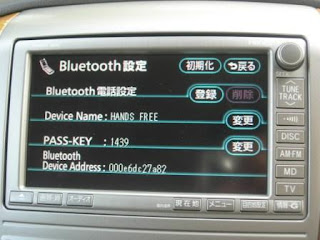 Touch the Erase (削除) button and the following screen will appear.
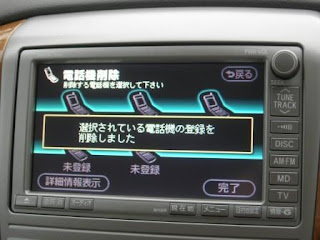
 Touch Yes (はい) to confirm delete the pairing or NO (いいえ) to abandon the operation. If you choose yes, the following screen will be shown to confirm the deletion.
In the next post I will blog on how to use the hands-free function.


