Monday, September 14, 2009
Model Code for Pre-Facelift Toyota Alphard MZG
The Alphard G MZG carries the following model codes:
MNH10-PFPQK-G for 2WD model
MNH15-PFPQK-G for 4WD model
The Alphard V MZG carries the following model codes:
MNH10-PFPQK-P for 2WD model
MNH15-PFPQK-P for 4WD model
I think with these information I am ready to compile a list of all the model codes for 1st Gen Toyota Alphard as I mentioned in my previous post.
Watch this space for the table pretty soon.
Update: I have uploaded the table here. Click the link to download it.
Thursday, August 20, 2009
Toyota Alphard MZ/MZG Model
The MZ has cloth seats while the MZG comes standard with leather seats. The cloth in the MZ has a slightly different texture from those cloth used in the AX and MX model. The photo below shows the cloth used in the MZ (left) compared those used on the AX/MX model (right)

The interior of a NFL MZ is shown below
Electric driver seat is a standard feature on MZ and MZG.
The MZG is the top of the range model. It has all the features of an MZ with the following additions:
- Beige-colour Leather seats
- Auto curtain
- Cruise control
- Mini-table in 2nd row on 7 seaters
- Footrest (odoman) on 7 seaters
- Heated Driver and Passenger Seats
Also most owners of MZG would normal specify the option of 5.1 theatre sounds system, power boot, VSC and TRC when they purchase the car. Therefore most of the MZG landed here would have the most complete specification of a Toyota Alphard. It is therefore not surprising that the MZG is the most expensive of all the Toyota Alphard model.
Toyota Alphard AS/MS Model
The AS/MS is the sporty version of the 1st Gen Toyota Alphard. It is differentiated from the AX-L/MX-L in the exterior as well as the colour of the interior. The AS/MS model comes in 7-seaters arrangement only. The exterior difference was covered in this post previously.
The AS/MS have all the following features:
- Head Unit with CD/MD - PFL only
- Head Unit with DVD, MD, MP3, Bluetooth and 30GB Harddisk (HDD) - NFL only
- Smart door lock system
- Front and rear camera
- Black-wood panel centre console
- Black interior colour
- Black colour seats
- 17-inch wheels
- Aero bumpers and side skirt
- Larger diameter tail pipe
- armrest and back pocket on middle seats of 7-seaters
- Round-shape front fog lamp
The AS/MS also comes in Alcantara package where the seats are fitted with Alcantara cloth. Shown below is the interior of a PFL AS/MS model.

The NFL model comes with a larger HU with LD display.
Since the AS/MS has a sporty exterior, a lot of buyers would like to go for this model but unfortunately the supply of these models are quite low. Hence once a unit is available in any of the dealer it will get taken very fast by those eager buyers.
In the next post, I will cover the MZ/MZG model.
Toyota Alphard AX/MX model
Shown below is the interior of a PFL AX/MX model.
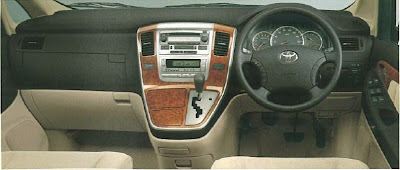

The AX-L and MX-L is considered the Luxury edition. They are available in either 7 or 8-seaters arrangement. The 7-seaters arrangement is also specifically fitted to cater for those owner who need a side lift seat (or what is called a wellcab).
The AX-L and MX-L have all the following features:
- CD Player - PFL only
- Head Unit with DVD, MD, MP3, Bluetooth and 30GB Harddisk (HDD) - NFL only
- Roof mounted LCD - NFL only
- smart door lock system
- sonar sensor
- Front and rear camera
- Orange-wood panel centre console
- Beige interior colour
- Beige colour Seats
- 16-inch wheels
- No body kit
- armrest and back pocket on middle seats of 7-seaters
- Tray table on the back of the middle row of 8-seaters
- Left Power Sliding door (standard)
If the AX/MX has any of the above options fitted, then it is an option that the original owner has chosen when he/she purchased the car in Japan.
In the next post, I will cover the AS/MS model.
Saturday, August 15, 2009
Maintenance Reminders In The HU on Toyota Alphard
Start by pressing the G-Book (情報-G) button to bring up it main menu.
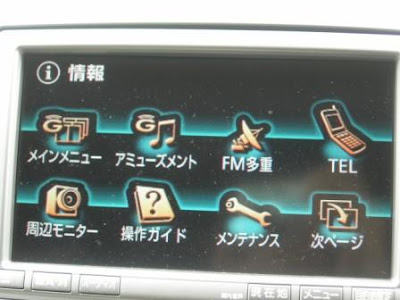
Touch the Maintenance (メンテナンス) button to bring up the Maintenance Settings screen.
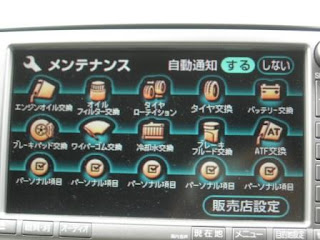 On this screen, you find the following maintenance items (from top left to bottom right of the first two rows):
- Engine Oil Change (エンジンオイル交換)
- Oil Filter Change (オイルフィルターを交換)
- Tire Rotation (タイヤローテーション)
- Tire Change (タイヤ交換)
- Battery Change (バッテリー交換)
- Brake Pad Change (ブレーキパッド交換)
- Wiper Comb Change (ワイパーコム交換)
- Coolant Water Change (冷却水交換)
- Brake Fluid Change (ブレーキフルート交換)
- ATF Change (ATF交換)
To enter the reminder information, press any of the first 0 button above and you'll get a screen similar to the one shown below
Touch the Notification Date (お知らせ日) button which will bring up this screen for you to enter the date in Year/Month/Day format (Japanese format).
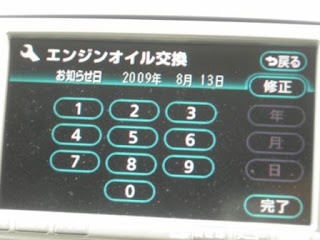
Touch the Complete (完了) button to return to the previous screen.
Touch the Notification Distance (お知らせ距離) button to enter the mileage when this item was changed and then lastly enter the mileage from when the next change should be made.
For some items, you'll only enter the date while other you will have to enter all 3 values.
Touch the Setting Complete (設定完了) button and it will ask you to confirm the action, touch the Yes (はい) button to confirm it.
When you touch any one of the 5 Personal Item (パーソナル項目) button, you will be brought to this screen.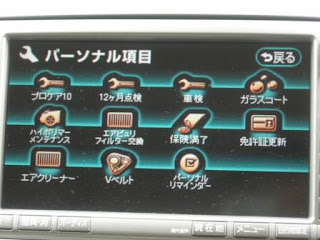
On this screen, you can enter reminder value for the following personal items:
- Professional Care 10 (プロケア10)
- 12 months inspection (12ヶ月点検)
- Car Inspection (車検)
- Coated Glass (ガラスコート)
- High Polymer Maintenance (ハイポリマー メンテナンス) ?
- Air filter change (エアフィルター交換)
- Insurance Renewal (保険満了)
- Driving Permit Renewal (免許証更新)
- Air Cleaner (エアクリーナー)
- V-belt (Vベルト)
- Personal Reminder (パーソナル リマインダ)
When you touch on any of the button it will bring up the same reminder screen as the standard maintenance item shown above for you to enter the value.
Back at the Maintenance screen, remember to touch on the Do (する) button next to words Auto Reminder (自動通知) at the top right of the screen to enable the automatic reminder.
This will ensure that you'll be reminded on those item(s) that you have entered maintenance information when the mileage for that reminder has been reached. When the mileage for a particular mainteannce has been reached or the date has been reached, a message will pop-up in the LCD to remind you.
It is interesting to note that the Japanese has thought of all these for their car owners.
Friday, August 7, 2009
What's the ruling on privacy glass?
But what is the guideline on the specification on privacy glass for imported car like the Toyota Alphard? The JPJ website doesn't has specific guideline on this and the only way to read the above ruling is listed in theis page. Unfortunately it is written in Bahasa Malaysia which translate to "all the glass at front must have vehicle light transmission (VLT) >70% while side and rear glass must have VLT > 50%". If this is the ruling apply by JPJ then I guess all Toyota Alphard imported into this country would not pass the specification. Also, without a clear guideline, they are only issuing the inspection notice rather then issuing a summon to the owner for violation.
Then the question would be if JPJ doesn't allow imported car to have privacy glass that doesn't meet the specification, why would the dealers are allow to import these vehicles into the country.
The logic goes that our Ministry of Trade International (MITI) issues permits for vehicles to be imported. Its permits specify brand, model, etc but does not go into details regarding specification for privacy glass. Then our Customs Department is only interested in whether the cars have a legal Approved Permit and determine any payable tax. With these two conditions met, the cars get into the country legally and cannot actually be stopped since they meet importation laws.
The issue starts when the cars are sent to JPJ for registration. JPJ will evaluate the cars on technical specifications which must comply with our Vehicle Construction Rules, which include permissible levels of tinting. This is where the problem starts. JPJ will find that the tinting is beyond permissible levels but because it is not a film and actually the glass itself, it cannot be changed just like that. But the importer has already sold it to the dealer and the dealer has a customer who has paid a deposit for it.
To get around this ruling, the dealers will change these dark glasses (temporarily) to clear glasses before sending the car to Puspakom for inspection. After getting the report back from Puspakom verifying that the glass has passed inspection, the dealer changed the glasses back to the original dark one before delivering to the customer. From the customer perspective, since there is an approval by Puspakom, then there shouldn't be any problem with JPJ. The recent operation by JPJ seems to indicate that they are strictly enforcing their ruling on privacy glass.
There has been many attempt by JPJ to enforce the ruling on tinting before and their efforts was stopped by the Government several times. I am wondering if this is an indication that they are going all out to target all Toyota Alphard owners.
The privacy glass on the pre-facelift model is actually darker than those on the new-facelift model. Therefore if this new "ruling" by JPJ is strictly enforced, then all pre-facelift model owners will have to change the privacy glass to clear glass. I don't know if the new-facelift model privacy glass will pass the specification but very unlikely.
Another AOC member who recently bought a 2nd generation Toyota Alphard was also "caught" in a recent operation and was also asked to change the privacy glass. I don't know how long all Alphard owners can hold out before they see the next JPJ Operation and get a notice in their hand. I am not looking forward to that day myself. In the AOC forum, many members have started a discussion on putting up community voice to the media to highlight this concern.
I heard that our Transport Minister also drive a Toyota Alphard. I wonder if he has to change his privacy glass!
Thursday, July 16, 2009
Other Configuration Options in the HU
When you press the G-Book (情報-G) button, it will bring you to the G-Book Main Menu as shown below.
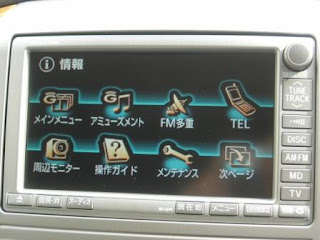
Touch the "Surrounding Monitor" ( 周辺モニタ) button to bring up this Setting screen.
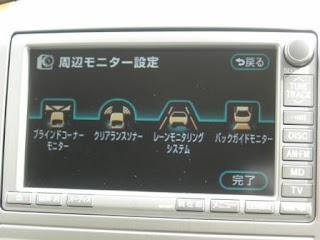 On this screen, touch the "Blind Corner Monitor" (ブラインドコーナーモニター) button to bring up this screen.
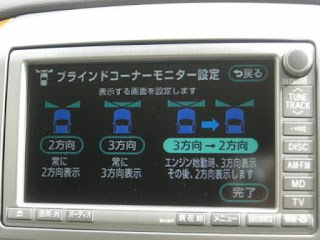 You select either 2-directions (2 方向), 3-directions (3 方向) or switchable between 2-directions and 3-directions. With the last option, when you activate the front camera button, there is an option (circled in red below) at the bottom of the screen that you can "touch" to switch the camera view.
Back at the "Surrounding Monitor Setting" ( 周辺モニタ設定) screen, touch the "Clearance Sonar " (クリアランスソナー) Sound Setting button to bring up this screen. You can configure the sound volume of the sonar either from low volume (小) to high volume (大).
Press the "Complete" (完了) button to return to the previous screen.
Back at the "Surrounding Monitor Setting" ( 周辺モニタ設定) screen, touch the "Lane Monitoring System" (レーンモニタリングシステム) button to bring up this screen
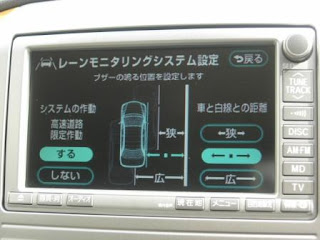
The default setting is already set with the car in the middle of the lane, with the white line on the right as the extreme right of the lane. If you prefer to have a narrower lane size, touch the "狭" button, it will move the car closer to the white line as shown below
 If you prefer a widen lane, then touch the "広" button for a wide lane size as shown below
 The lane monitoring system is turn on by default for high speed monitoring. You can turn it off by touching the "しない" button on the bottom left. This function only work when the speed is above 80km/h.
Back at the "Surrounding Monitor Setting" ( 周辺モニタ設定) screen, touch the "Back Guide Monitor" (バックガイドモニター) button to bring you to the Setting screen as shown below. The first option is the "Parallel Guide Sound Setting" (縦列ガイド音声設定) allow you to configure sound volume of the parallel parking guide as shown below.
The second option allow you to configure whether to show the initial point of your car for parallel parking shown on the monitor.
 The 3rd option allow you to configure the line type of your rear camera. Select "はい" to select the green line type as shown below
 If you choose "しない", it will use the default yellow, red and green lines for rear parking guide
Sunday, July 12, 2009
How to set up the Phone Book In Your Toyota Alphard?
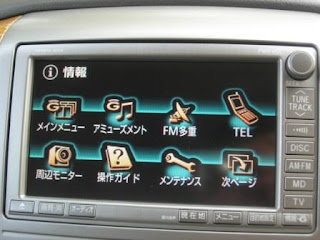 Touch the TEL button to bring up the Telephone Settings screen.
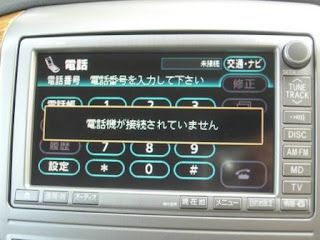 First time when you configure the Telephone Settings it will remind you that no telephone is connected. Just wait for the message to dismiss by itself.
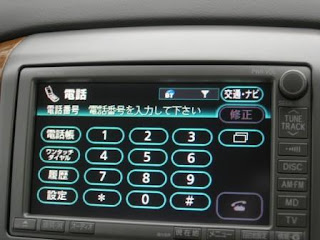 Touch the "Setting" (設定) button to bring up the Setting screen.
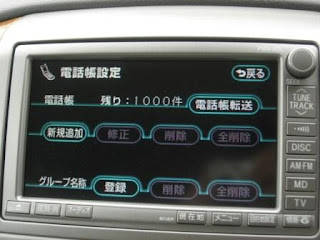
The HU phone book can stored up to a maximum of 1000 phone book. Touch the "New Entry" (新規追加) button to bring up the "Phone Book Entry" screen.
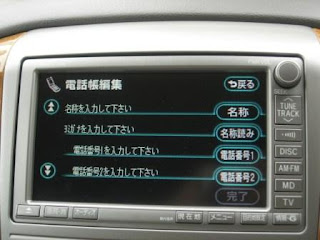 Touch the "DOWN" arrow on the left to bring you to the 2nd page as shown below.
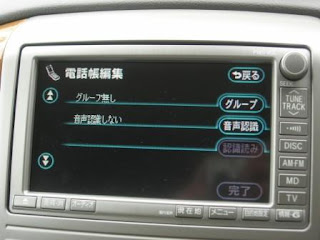 To store the phone book details, start with page 1 and touch the "Name" (名称) button to bring up the "Name Change" screen.
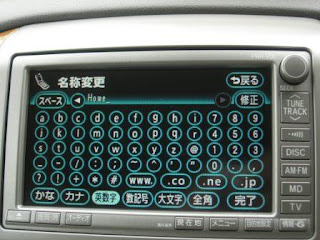
Here I have change it to "Home". Touch the "Complete" (完了) button to return to the "Phone Book Entry" screen
Touch the "Phone No 1" (電話番号 1) button to bring up the Phone Number entry screen.
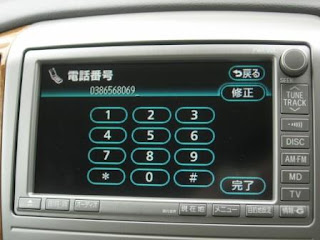 After you enter the phone number, the following screen will appear for you to select the phone type. The important option are "Mobile" (携帯), "Home" (自宅), "Work" (仕事), and "Other" (その他).
If you have another phone number, touch the "Phone No 2" (電話番号 2) button to bring up the entry screen to enter that number.
On the second page, touch the "Group" (グループ) button to select the group. I will touch on this later.
The last button is for voice recognition (音声認識) which is a cool feature but you have to program the voice recognition function to use it.
Back at the Phone Book Setting screen, you can add group to organize your phone book entries. Touch the "Register" (登録) button to select the group number, enter the name and the the icon for this group. Once you are done, back at the second page of the "Phone Book Entry" screen, you can select the group that you have defined as shown below.
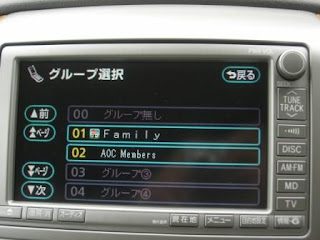 Once you have completed the phone book entries, the next time when you touch the Telephone button on the steering wheel, it will bring up this screen.
 To make a call, you can directly key in the number or touch the "Phone Book" (電話帳) button which bring up the Phone Book Screen.
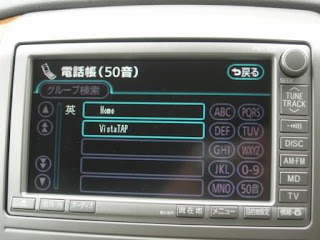 Just touch on the phone book you want to call and it will dial that number and display this screen.
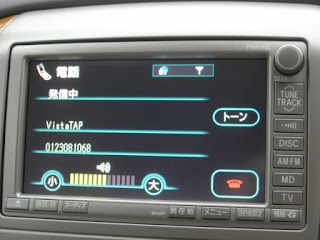 The icons on the top shows the Bluetooth status, the battery status as well as the strength of the phone signal reception.
When the call is in progress, it will shows the duration of the call as below
 You can touch the red colour "End Call" button or press the "End Call" button on the steering wheel to terminate the call.
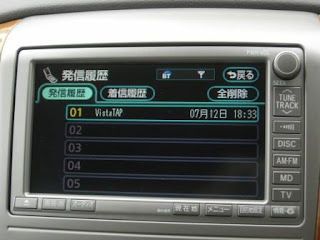
To view the history of your phone calls, touch the "Call History" (履歴) button. This will bring up the Dialled History screen as shown below.
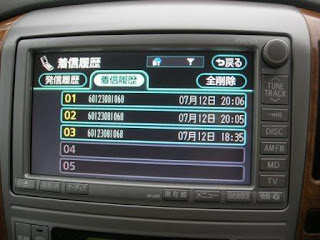
 Touch the "Received Call History" (着信履歴) tab to show the number of incoming calls.
 I hope this help you to start using the phone feature on the NFL HU.
Using the Hands Free Function In Your Toyota Alphard

When you received a call on your mobile phone, the screen will change to the incoming call screen as shown below, you can either press the "Receive Call" button on your steering wheel, or the green colour "Receive Call" button on the LCD to receive the call.
Once you touched the Receive call button, you can hear the incoming call via the speakers while you can talk to the microphone which is located on the right side of the dashboard behind the steering wheel.
The screen will display the call details as shown below

You can disconnect the conversation by touching the red colour "End Call" button or press the End Call button on the steering wheel. Or wait for the calling party to disconnect the call and a message will shown as below

In the next post, I will cover how you can enter your contact information into the Phone Book.
Friday, July 10, 2009
Bluetooth Connection to the HU In Your Toyota Alphard
Start by pressing the G-Book (情報-G) button to bring up it main menu.
 Touch the TEL button to bring up the Telephone Settings screen
 First time when you configure the Telephone Settings it will remind you that no telephone is connected. Just wait for the message to dismiss by itself.
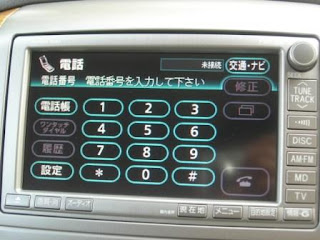 Touch the 設定 button to bring up the Setting screen
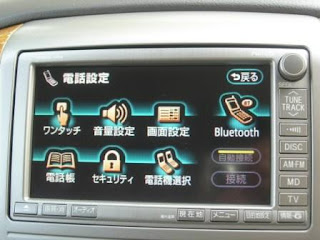 In this screen you can configure the One-Touch (ワンタツチ), sound volume setting (音量設定), screen setting (画面設定), Bluetooth setting, Telephone book (電話帳), Security (セキュリティ), and Phone unit selection (電話機選択) functions.
When you touch the Bluetooth button, it will bring up this screen
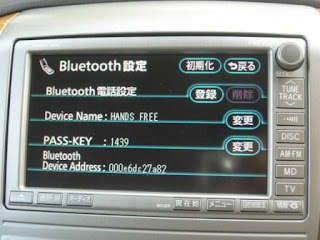 Make sure you bluetooth function on your mobile phone is activated and now touch the 登録 button and the HU will wait for you to pair your mobile phone to it as shown below
 Go to your mobile phone now to pair with the bluetooth device on the HU with your phone. The device name is by default call "HANDS FREE". Once the device is found by your bluetooth function on your mobile phone, you'll have to key in the pass-key as shown on the screen (your pass key value will be different from mine) and the bluetooth devices will be paired.
Once the pairing is successful, the screen will now display the following message 
Once the pairing is done, you'll can check the paired device by touching the "電話機選択" button to display the Phone Unit Selection page
To comfirm the detail of the paired device, you can touch on that device and it will display the pairing details as shown below. In the Bluetooth setting screen, you can also change the Device Name and Pass Key by touching the 変更 button to change it value using the Edit screen shown below
  I wrote in this post previously on how to use the Edit screen.
If you change your mobile phone and want to delete the paired device from the HU, you'll go back to the Bluetooth setting page as shown below.
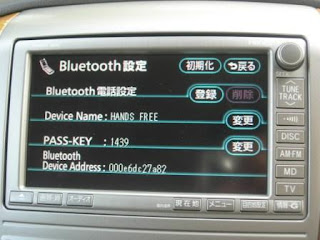 Touch the Erase (削除) button and the following screen will appear.
 Touch Yes (はい) to confirm delete the pairing or NO (いいえ) to abandon the operation. If you choose yes, the following screen will be shown to confirm the deletion.
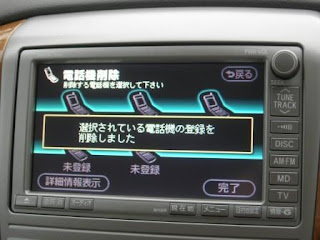
In the next post I will blog on how to use the hands-free function.


