After my misforture last weekend, I improved the security of my giant by installing an IES GSM alarm system. In this post, I will briefly cover it functions but I wouldn't go into the details on how to operate it nor will I show any photos.
Since the communications is based on GSM, it provide the capability for me to interact with the car alarm system remotely.
With this alarm system, now I will be warned (via SMS) if the door is open/unlocked due to unauthorized access. I can arm and disarm the alarm remotely. If the battery is removed from the car such that power is cut off to the alarm (there is a small battery pack to backup the alarm system), I will also be warned of such intrusion. If there is a break-in and I will be warn via SMS, I can choose to use my phone to listen to any conversation or sounds in the car and I can speak to my phone and send verbal warning to the thief inside the car to bugger off.
In the event that the thief successfully stolen the car (hopefully not) I can remotely do an emergency override and stop the engine. That way the thief cannot continue to drive the car. After that I can use the Friend Finder feature to locate the current position of the car so that I can retrieve it. I know of one case where another giant owner actually use this feature to disable his giant engine and then located it 40 minutes after he discovered his car was stolen in broad day light.
In the event while I am in the car and there is an attempt by anyone to try a force break-in to hijack my car I can press a panic button that will send an SMS to my wife to warn her that I am in trouble. She can use the Friend Finder feature to locate my whereabout.
Let hope this alarm system will truly deter any future attempts.
Saturday, July 25, 2009
Monday, July 20, 2009
Break In Attempt to Steal A Toyota Alphard
Sometime life is full of surprises and what I wrote here is truly a surprise to me. Yesterday when I got to my car and opened the driver door I saw this!
 Apparently someone has broke into my car and try to steal it. I have a feeling that the thief have experience with this kind of attempt. They have found a way to ply open the driver door (which I won't post the photo here). They actually know how to open up the cover to the speedometer, remove the lower cover of the steering wheel and dismantled the ignition switch faceplate to gain access to the ignition module.
Then they tried to remove the ignition module but faced resistence in getting if off the steering wheel. Therefore their next attempt is to use a power drill (now I know why the cigarette lighter cover is opened) to try to drill through the ignition module from the top and remove the immobilizer module from it. Look what have they done to the ignition module! The drilling has left metal debris all over the ignition module, the driver seat and the floor mat.
The problem I faced now is that without the ignition module and the immobilizer the car cannot be started at all.
Since it happened on a Sunday, there are no workshops available to call for help. I have to arrange for a locksmith to come over on Monday. He somehow (well this is their trade secret) managed to dislodge the ignition module and took it back to his shop. He has a way to rebuilt the ignition module with parts that he obtained from his source. He will do some programming to the immobilizer module so that the master key that I have now can be reuse to start the car. As of the writing of this post, he is still working on it. Hopefully he is able to get this done by tomorrow.
The sad thing about this whole incident is that it happen inside guarded compound where I stay. The security guards are just not doing their jobs. When confronted they gave all sort of excuses. I doubt they ever patrol that area at night. I have to made a special request to them on that night to do their patrol near my car (as it is stranded now).
On the same day of the incident, I went back to that area at 12:00 midnight and I don't see any security guards around the area. I return to the place again at 1:30am and saw one security guard coming around. Interesting that he don't even have a torchlight with him. I have to use my own torchlight to scout the surrounding area.
Well look like this car is pretty popular with the thief nowaday. I guess they can fetch a high value in the open market or sell it as spare parts.
PS. When I was making a police report, 3 students came to the same police beat and wanted to make a report that they have been molested by two foreigners from unknown country. What has gotten to our society? Is getting foreign workers is a good things for this society and this country? Well time will tell.
PPS. The locksmith managed to fix my ignition module and did all the necessary programming so now I am driving the car again.
Saturday, July 18, 2009
Replace Air Filter Element in Your Toyota Alpha
This post shows you how to replace the air filter of the Toyota Alphard 2.4L model.
Open the hood and you'll see the air filter box on top of the engine as shown below.
 In front of the air filter box on the right side is the air tube that channel cold air into the air filter box. Loosen the clip holding the air tube to disconnect the tube from the air filter box.
 Now just replace the air filter box cover and ensures all the clips are securely fasten.
Enjoy your new air filter element.
Open the hood and you'll see the air filter box on top of the engine as shown below.
 In front of the air filter box on the right side is the air tube that channel cold air into the air filter box. Loosen the clip holding the air tube to disconnect the tube from the air filter box.
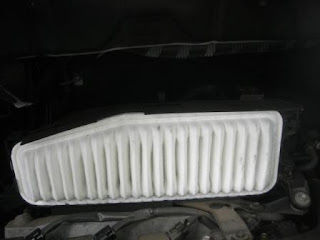
On the left side of the air filter box are two clips that holds the air filter box cover. Loosen them by flipping the front clip outward and then unhook the rear clip as shown below. Now you can completely remove the air filter box cover to access to the air filter element. In the photo below is my KNN replacement air filter element.
 The air filter element can only be fitted into the air filter box in one direction (with the label facing the inner side of the air filter box) as shown below.
 Now just replace the air filter box cover and ensures all the clips are securely fasten.
Enjoy your new air filter element.
Thursday, July 16, 2009
Other Configuration Options in the HU
While the G-Book online services is not operational here, there are a few options in the G-Book section in the HU that you can configure. In this post, I will cover those options that you can configure.
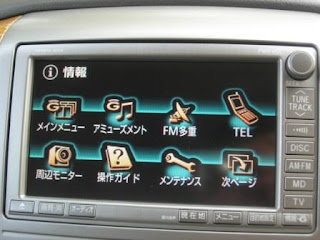
When you press the G-Book (情報-G) button, it will bring you to the G-Book Main Menu as shown below.
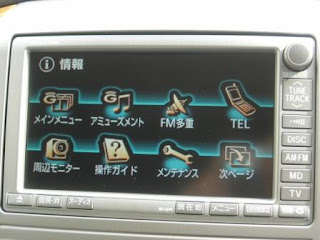
Touch the "Surrounding Monitor" ( 周辺モニタ) button to bring up this Setting screen.
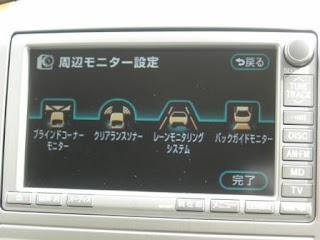 On this screen, touch the "Blind Corner Monitor" (ブラインドコーナーモニター) button to bring up this screen.
The default setting is already set with the car in the middle of the lane, with the white line on the right as the extreme right of the lane. If you prefer to have a narrower lane size, touch the "狭" button, it will move the car closer to the white line as shown below
When you press the G-Book (情報-G) button, it will bring you to the G-Book Main Menu as shown below.

Touch the "Surrounding Monitor" ( 周辺モニタ) button to bring up this Setting screen.
 On this screen, touch the "Blind Corner Monitor" (ブラインドコーナーモニター) button to bring up this screen.
 You select either 2-directions (2 方向), 3-directions (3 方向) or switchable between 2-directions and 3-directions. With the last option, when you activate the front camera button, there is an option (circled in red below) at the bottom of the screen that you can "touch" to switch the camera view.
Back at the "Surrounding Monitor Setting" ( 周辺モニタ設定) screen, touch the "Clearance Sonar " (クリアランスソナー) Sound Setting button to bring up this screen. You can configure the sound volume of the sonar either from low volume (小) to high volume (大).
Press the "Complete" (完了) button to return to the previous screen.
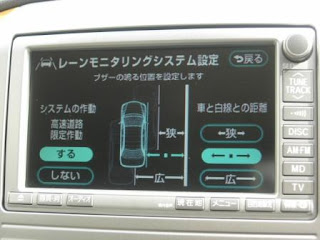
Back at the "Surrounding Monitor Setting" ( 周辺モニタ設定) screen, touch the "Lane Monitoring System" (レーンモニタリングシステム) button to bring up this screen

The default setting is already set with the car in the middle of the lane, with the white line on the right as the extreme right of the lane. If you prefer to have a narrower lane size, touch the "狭" button, it will move the car closer to the white line as shown below
 If you prefer a widen lane, then touch the "広" button for a wide lane size as shown below
 The lane monitoring system is turn on by default for high speed monitoring. You can turn it off by touching the "しない" button on the bottom left. This function only work when the speed is above 80km/h.
Back at the "Surrounding Monitor Setting" ( 周辺モニタ設定) screen, touch the "Back Guide Monitor" (バックガイドモニター) button to bring you to the Setting screen as shown below. The first option is the "Parallel Guide Sound Setting" (縦列ガイド音声設定) allow you to configure sound volume of the parallel parking guide as shown below.
The second option allow you to configure whether to show the initial point of your car for parallel parking shown on the monitor.
 The 3rd option allow you to configure the line type of your rear camera. Select "はい" to select the green line type as shown below
 If you choose "しない", it will use the default yellow, red and green lines for rear parking guide

Sunday, July 12, 2009
How to replace the aircon filter?
This post will explains how to replace the aircon filter in your giant.
Open the lower glove box and pushes both edge (the circled area) of the glove box to release it from the dashboard.
 Look at the left hand side of the glove box now. There is another holder that hold the glove box from falling off.
 Squeezed the "securing" plug (as circled) to release it from holder and the glove box can now be completely remove from the dashboard as shown below.

Now you can see the aircond filter tray as shown below.
Open the lower glove box and pushes both edge (the circled area) of the glove box to release it from the dashboard.
 Look at the left hand side of the glove box now. There is another holder that hold the glove box from falling off.
 Squeezed the "securing" plug (as circled) to release it from holder and the glove box can now be completely remove from the dashboard as shown below.
Now you can see the aircond filter tray as shown below.

Squeeze the two clips at either side of the tray toward the center and pull it out.

Replace the air cond filter and then reinsert the tray back into the slot. Secure the glove box and you are done.

Replace the air cond filter and then reinsert the tray back into the slot. Secure the glove box and you are done.
How to set up the Phone Book In Your Toyota Alphard?
Once you have pair your mobile phone with the HU via bluetooth connection, you will be using the hands-free function to make call or receiving calls. In this post, I will describe the steps on how to set up the phone book on the head unit so that you can make phone call using the numbers stored in the phone book.
 Touch the TEL button to bring up the Telephone Settings screen.
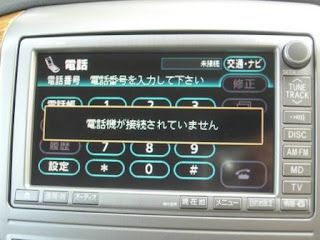 First time when you configure the Telephone Settings it will remind you that no telephone is connected. Just wait for the message to dismiss by itself.
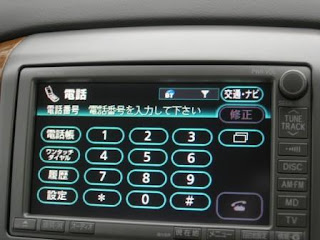 Touch the "Setting" (設定) button to bring up the Setting screen.
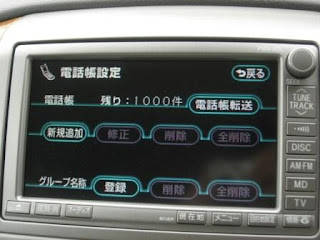
The HU phone book can stored up to a maximum of 1000 phone book. Touch the "New Entry" (新規追加) button to bring up the "Phone Book Entry" screen.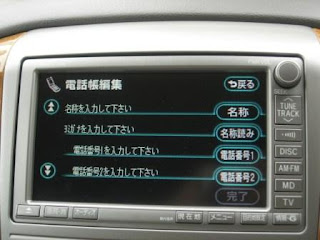 Touch the "DOWN" arrow on the left to bring you to the 2nd page as shown below.
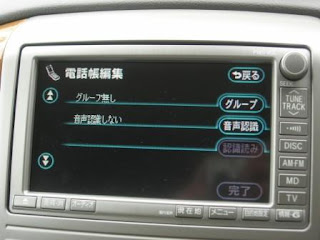 To store the phone book details, start with page 1 and touch the "Name" (名称) button to bring up the "Name Change" screen.

Here I have change it to "Home". Touch the "Complete" (完了) button to return to the "Phone Book Entry" screen
Touch the "Phone No 1" (電話番号 1) button to bring up the Phone Number entry screen.
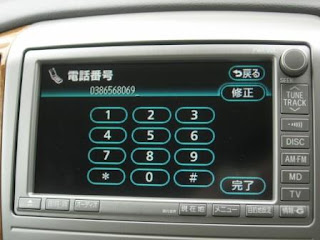 After you enter the phone number, the following screen will appear for you to select the phone type. The important option are "Mobile" (携帯), "Home" (自宅), "Work" (仕事), and "Other" (その他).
If you have another phone number, touch the "Phone No 2" (電話番号 2) button to bring up the entry screen to enter that number.
On the second page, touch the "Group" (グループ) button to select the group. I will touch on this later.
The last button is for voice recognition (音声認識) which is a cool feature but you have to program the voice recognition function to use it.
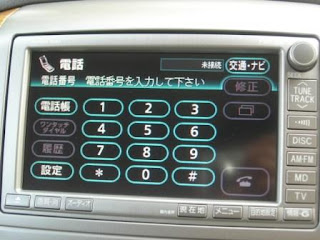
 Once you have completed the phone book entries, the next time when you touch the Telephone button on the steering wheel, it will bring up this screen.
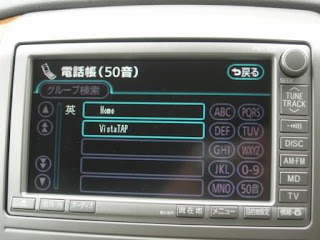 Just touch on the phone book you want to call and it will dial that number and display this screen.
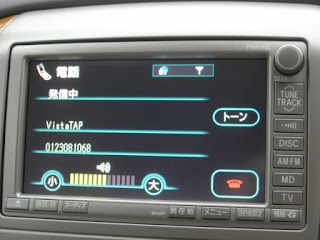 The icons on the top shows the Bluetooth status, the battery status as well as the strength of the phone signal reception.
When the call is in progress, it will shows the duration of the call as below
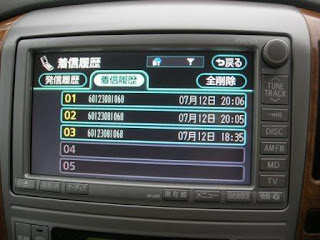
 Touch the "Received Call History" (着信履歴) tab to show the number of incoming calls.
 I hope this help you to start using the phone feature on the NFL HU.
Start by pressing the G-Book (情報-G) button to bring up it main menu.
 Touch the TEL button to bring up the Telephone Settings screen.
 First time when you configure the Telephone Settings it will remind you that no telephone is connected. Just wait for the message to dismiss by itself.
 Touch the "Setting" (設定) button to bring up the Setting screen.
Touch the telephone book (電話帳) button to bring up the Phone Book Setting screen.

The HU phone book can stored up to a maximum of 1000 phone book. Touch the "New Entry" (新規追加) button to bring up the "Phone Book Entry" screen.
 Touch the "DOWN" arrow on the left to bring you to the 2nd page as shown below.
 To store the phone book details, start with page 1 and touch the "Name" (名称) button to bring up the "Name Change" screen.
Here I have change it to "Home". Touch the "Complete" (完了) button to return to the "Phone Book Entry" screen
Touch the "Phone No 1" (電話番号 1) button to bring up the Phone Number entry screen.
 After you enter the phone number, the following screen will appear for you to select the phone type. The important option are "Mobile" (携帯), "Home" (自宅), "Work" (仕事), and "Other" (その他).
If you have another phone number, touch the "Phone No 2" (電話番号 2) button to bring up the entry screen to enter that number.
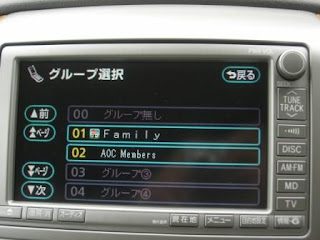
On the second page, touch the "Group" (グループ) button to select the group. I will touch on this later.
The last button is for voice recognition (音声認識) which is a cool feature but you have to program the voice recognition function to use it.
Back at the Phone Book Setting screen, you can add group to organize your phone book entries. Touch the "Register" (登録) button to select the group number, enter the name and the the icon for this group. Once you are done, back at the second page of the "Phone Book Entry" screen, you can select the group that you have defined as shown below.
 Once you have completed the phone book entries, the next time when you touch the Telephone button on the steering wheel, it will bring up this screen.
 To make a call, you can directly key in the number or touch the "Phone Book" (電話帳) button which bring up the Phone Book Screen.
 Just touch on the phone book you want to call and it will dial that number and display this screen.
 The icons on the top shows the Bluetooth status, the battery status as well as the strength of the phone signal reception.
When the call is in progress, it will shows the duration of the call as below
 You can touch the red colour "End Call" button or press the "End Call" button on the steering wheel to terminate the call.
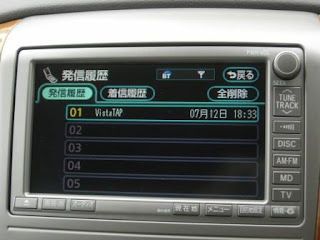
To view the history of your phone calls, touch the "Call History" (履歴) button. This will bring up the Dialled History screen as shown below.
 Touch the "Received Call History" (着信履歴) tab to show the number of incoming calls.
 I hope this help you to start using the phone feature on the NFL HU.
Using the Hands Free Function In Your Toyota Alphard
If you HU has been paired with your mobile phone previously via bluetooth connection, next time when you get into your car, the bluetooth connection will be automatically establish and you'll see a message displayed on your LCD screen as shown below.

When you received a call on your mobile phone, the screen will change to the incoming call screen as shown below, you can either press the "Receive Call" button on your steering wheel, or the green colour "Receive Call" button on the LCD to receive the call.

In the next post, I will cover how you can enter your contact information into the Phone Book.

When you received a call on your mobile phone, the screen will change to the incoming call screen as shown below, you can either press the "Receive Call" button on your steering wheel, or the green colour "Receive Call" button on the LCD to receive the call.

Once you touched the Receive call button, you can hear the incoming call via the speakers while you can talk to the microphone which is located on the right side of the dashboard behind the steering wheel.
The screen will display the call details as shown below

You can disconnect the conversation by touching the red colour "End Call" button or press the End Call button on the steering wheel. Or wait for the calling party to disconnect the call and a message will shown as below

In the next post, I will cover how you can enter your contact information into the Phone Book.
Friday, July 10, 2009
Bluetooth Connection to the HU In Your Toyota Alphard
The NFL HU uses bluetooth connection extensively for many of its communication functions. If you have a bluetooth-enabled phone, you can also connect it wirelessly to the HU to use it hands-free function. I will describe the steps in this post how to set up the bluetooth connection.
Start by pressing the G-Book (情報-G) button to bring up it main menu.
 Touch the TEL button to bring up the Telephone Settings screen
 First time when you configure the Telephone Settings it will remind you that no telephone is connected. Just wait for the message to dismiss by itself.
 Touch the 設定 button to bring up the Setting screen
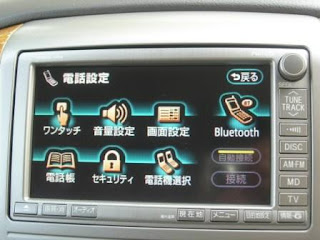 In this screen you can configure the One-Touch (ワンタツチ), sound volume setting (音量設定), screen setting (画面設定), Bluetooth setting, Telephone book (電話帳), Security (セキュリティ), and Phone unit selection (電話機選択) functions.
When you touch the Bluetooth button, it will bring up this screen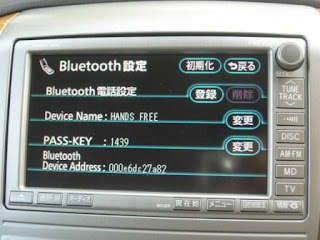 Make sure you bluetooth function on your mobile phone is activated and now touch the 登録 button and the HU will wait for you to pair your mobile phone to it as shown below
 Touch the Erase (削除) button and the following screen will appear.
Start by pressing the G-Book (情報-G) button to bring up it main menu.
 Touch the TEL button to bring up the Telephone Settings screen
 First time when you configure the Telephone Settings it will remind you that no telephone is connected. Just wait for the message to dismiss by itself.
 Touch the 設定 button to bring up the Setting screen
 In this screen you can configure the One-Touch (ワンタツチ), sound volume setting (音量設定), screen setting (画面設定), Bluetooth setting, Telephone book (電話帳), Security (セキュリティ), and Phone unit selection (電話機選択) functions.
When you touch the Bluetooth button, it will bring up this screen
 Make sure you bluetooth function on your mobile phone is activated and now touch the 登録 button and the HU will wait for you to pair your mobile phone to it as shown below
 Go to your mobile phone now to pair with the bluetooth device on the HU with your phone. The device name is by default call "HANDS FREE". Once the device is found by your bluetooth function on your mobile phone, you'll have to key in the pass-key as shown on the screen (your pass key value will be different from mine) and the bluetooth devices will be paired.
Once the pairing is successful, the screen will now display the following message 
Once the pairing is done, you'll can check the paired device by touching the "電話機選択" button to display the Phone Unit Selection page
To comfirm the detail of the paired device, you can touch on that device and it will display the pairing details as shown below. In the Bluetooth setting screen, you can also change the Device Name and Pass Key by touching the 変更 button to change it value using the Edit screen shown below
  I wrote in this post previously on how to use the Edit screen.
If you change your mobile phone and want to delete the paired device from the HU, you'll go back to the Bluetooth setting page as shown below.
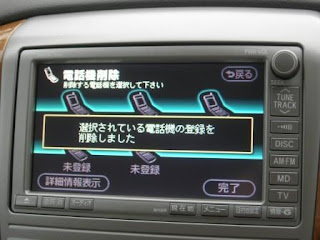
 Touch the Erase (削除) button and the following screen will appear.
 Touch Yes (はい) to confirm delete the pairing or NO (いいえ) to abandon the operation. If you choose yes, the following screen will be shown to confirm the deletion.

In the next post I will blog on how to use the hands-free function.
Subscribe to:
Posts (Atom)