Tuesday, June 30, 2009

Listening To Music In A Toyota Alphard

The head unit in the NFL model come with DVD player as well as a 30GB hard disk storage for playing recorded CD tracks.

To access to the DVD player, you'll need to press the "EJECT" button at the bottom left of the head unit. It will display the following screen for you to select which option you need.
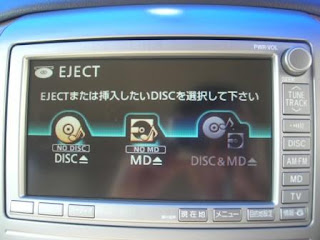
Toyota Alphard HU Eject Screen
When you touch the "DISC" image on the LCD, it will flip open the LCD panel for you to have access to the DVD slot as shown below.
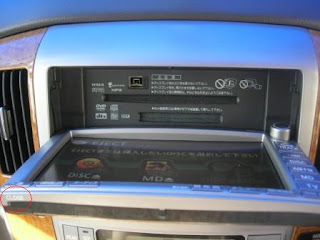
Toyota Alphard HU LCD Opened
If there is already a disc inside the DVD slot, touching the "DISC" image will eject that disc.

Once you inserted your CD/DVD into the DVD slot, you'll press the same "EJECT" button (now labelled CLOSE when view from the flip-opened position - see red circle) to close the LCD panel.

In this post, I will cover the music playing function of the DVD player while the future post I will cover the video function of the DVD player.

If you inserted a music CD into the DVD player, it will automatically start playing the music as well as automatically store (a configurable option) the CD tracks into the 30GB hard disk (if this CD has not been recorded before). The tracks from the CD are stored into the hard disk in the background while you play the tracks on the CD.

You know that the tracks on the CD are being stored 1st time into the hard disk by looking at the phrase "REC FAST" displayed at the top of the play time of the current track as shown below.
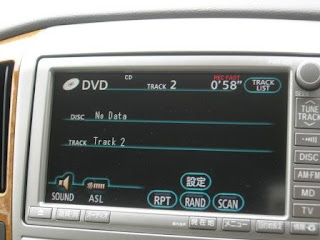
Toyota Alphard CD Recording
If you touch the "TRACK LIST" button at the top right on the LCD screen, it will take you to the TRACK LIST screen (see photo below) and you'll noticed that each track that has been stored hard disk will have the word "HDD" on the top left of each track title.

Toyota Alphard HU CD Recording in Progress
Once all the tracks on the CD has been stored, you can play the tracks again from the hard disk directly instead of inserting the same CD. Of course if you choose to, you can still play the CD track directly from the disc. To know whether the track is played from the CD or from the HDD, just looked at the title at the top left corner of the screen whether it is showing DVD or HDD (as shown below)
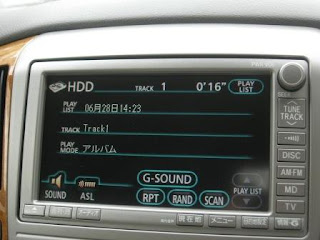
Toyota Alphard CD In Play
The time it take to store the tracks varied depending on the contents in your CD. It is advisable to play the CD long enough for the store operation to complete otherwise not all tracks will be stored into the hard disk. However, if you do stop the car while the recording is in progress, the next time when you play the same CD again, it will continue the recording from where it left off.

In the DVD play mode screen (see the 3rd photo from the top), there are a few buttons at the bottom right that you can "touch" to configure how the tracks are played. You can elect to repeat (RPT) a particular track, randomly (RAND) play a track or scan all track (SCAN). You can also control whether the CD tracks will be recorded automatically into the hard disk by touching the "設定" button. It will bring you to the following screen where you can opt to either automatically record (AUTO) or manually (SELECT) record the tracks.
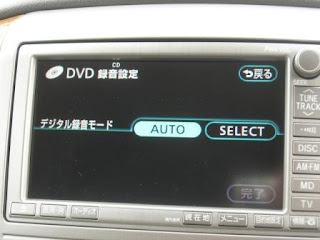
Toyota Alphard CD Auto Recording
BTW, the button at the top right of each screen is the return/cancel (戻る) button. Touch it to return to the previous screen.

In the next post, I'll describe in further details how to operate the HDD functions.

The Radio Function In a NFL Toyota Alphard

This blog continue from the last post where I cover the operation of the head unit.

To operate the radio, you'll press the "AM FM" button on the head unit and the preset radio channels will be displayed as shown in the photo below.

Toyota Alphard HU Radio Functions
Press the "AM FM" button again to switch between the AM and FM channels. If your radio channels are pre-set by your dealer, it should be highlighted and it should start to receive the radio signal immediately. To select another channel, just "touch" on one of the box labelled 1 to 6.

Do note that the radio channel frequency in Japan operate up to a maximum of 90MHz while the local radio channel runs up to 107MHz. Therefore, the standard head unit will not be able to receive some of the higher frequency radio channels operating in Malaysia. What most dealers will do (to sweeten the deal) is they will install a frequency booster to increase the reception of the radio unit so that it can receive local radio channels. The one installed by the dealer onto my giant is shown in the photo below.

Toyota Alphard Frequency Booster 1Toyota Alphard Frequency Booster 2 This unit allow the radio frequency reception to be boosted by increment of 12, 16 or 20 MHz. However do note that even though the frequency reception has been boosted, the displayed frequency on the LCD doesn't show the exact received frequency. Therefore, you might want to make a mental note of which frequency is for which radio channel. To tune the radio frequency to any of your favourite channel, just press the "Up" or "Down" portion of the "TUNE TRACK" button.

You can also use the "AUTO.P" function to try the auto-programming of the radio channels. However, I find that it is not very effective in setting the radio channel frequency correctly. I normally will let it run with the pre-set channel frequency.

To control the sound level of your speakers, you'll pressed the "SOUND" button to bring up this screen.

Toyota Alphard HU Sound Configuration
You can change the treble, mid and bass level by "touching" the "+" or "-" buttons on the screen. You can also fade the sound favouring the front, rear, left or right by "touching" each of these buttons.

Because of the limited capabilities on the standard head unit to control the sound level, I believed many owners who wanted a better sound system will opt to install aftermarket audio equipment to enhance the listening level in their giant. I have done it on my giant and I'll blog about it in future.

To control the automatic sound levelling function, you'll press the "ASL" button to bring up this screen.

Toyota Alphard HU ASL
The ASL function will increase the volume of the head unit depending on your setting to compensate for the intruding noise from outside as you drive you car. I normally leave it at MID.

There is also a screen on the G-Book function that allow you to tune your FM function automatically but I was not able to get it to work here.

The Head Unit In Your Toyota Alphard

The NFL giant (Toyota Alphard) comes with an 8-inch head unit with touch-screen LCD display. It is a 2-DIN unit that combine many control functions like GPS, audio video, sound system, vehicle information, parking guide monitor, lane monitoring system, sonar sensor, ETC system, and G-Book online service system.

Toyota call it the HDD Navigation System and provided a two volumes manual for the owner references. However, both manuals are in Japanese so I'll attempt to provide the information necessary to help owners to operate the head unit (as I loosely refer to the NFL HDD Navigation System).

Even though some of the buttons on the front of the head unit are in English, the displayed contents are in Japanese. For non-Japanese speaking owner, it will be quite a challenge in operating the head-unit trying to decipher the functions.

There are two options for the desperate owner; one to replace the head unit with an OEM head unit that has the buttons printed in English, however, all the content are still in Japanese so it doesn't help much. Two, to replace the entire head unit with after-market unit with English content but they may lose some functionalities such as front/rear camera line view, bluetooth connection, steering button control etc with come with the original head unit.

This post will attempt to explain some of the more common steps on how to operate the original head unit with photos as a guide.

When you turn on the ignition, the head unit display will also turn on as shown in the photo below


Toyota Alphard OEM HU
The first thing you'll heard is the voice of a sweet Japanese girl announcing the current date (obviously in Japanese). After that the display will prompt you with the message that you have not inserted the ETC card as shown in the photo below.

Toyota Alphard HU ETC Message

ETC is the equivalent of our SmartTAG toll payment gadget we have in this country. The ETC function is integrated into the head unit but it cannot be used in here since it is operating in a different mode from our Touch n Go system. You'll probably find a ETC card unit installed somewhere in your giant but it will not useable here. Many owner use it as card holder for the Touch n Go card instead.

You can turn off the date and ETC announcement if you don't need them. I will cover this in the other post.

After the ETC announcement, you'll operate the head unit by pressing the buttons around the edge of the head unit. Referring to the first photo above, from the top right in clockwise direction, the buttons are:

1. Power button - press it to turn on or off the head unit
2. "TUNE TRACK" button - use to tune the radio channel frequency or to select a particular music track while playing musics from the hard disk
3. "Information" button - use to receive traffic information (only work in Japan)
4. DISC button - this button cycle between the HDD function and the DVD function.
5. AM FM button - this button cycle between the AM radio channel and FM radio channel
5. MD button - this button operate the Mini Disc function.
6. TV button - this button operate the TV function or the Video function. Japanese TV transimission is based on NTSC format while our is PAL so the TV function cannot be use here.
7. 情報G button - this button operate the G-book online services. The G-book online services required registration with the G-Book Center in Japan and it only work in Japan but you can use it to configure some general settings for the head unit
8. "目的地設定" button - This button is used to configure the destination settings for the GPS function. This function is not operational here since the built-in GPS system don't work here
9. "メニユー" button - this button brings up the menu function to configure the GPS settings
10. " 現在地" button - this button allow you to configure the "current locations" settings for the GPS function, again not useable here.
11. "オーデイオ" button - this button brings up the audio screen display when you operate the DVD/HDD functions
12. " 画質.消" button - when you press this button, it will either bring up the display or cancel of the display
13. "Eject" button - this button flip open the LCD screen to allow you to access to the DVD/MD slots

In the next few posts I'll cover how to operate the radio, DVD, and HDD functions.

Sunday, June 7, 2009

What's the different between the G or V?

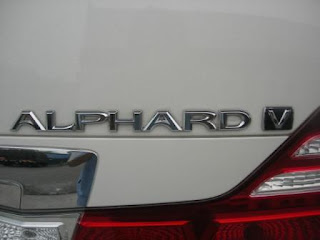
One of the common question frequently asked by potential Toyota Alphard buyer is what's the different between Alphard G and Alphard V label at the rear of the giant. The alphabet G and V actually refer to the logo on the right side of the tailgate as shown below.

Toyota Alphard Logo G/V There are actually two reasons for the differentiation. For owner who is buying imported used Alphard locally, the difference is most obvious on the front grille only. Look at the photo below for pre-facelifted model.

Toyota Alphard PFL Grille
Alphard G (photo on the left) has the front grille in full chrome and it has two horizontal grille lines across the center of the grille with the top line intercepting the Alphard logo. Also noticed there is a lot of smaller vertical grille lines.

Alphard V (photo on the right) has the top of the grille in chrome and the rest in body colour. It has four horizontal grille lines across the center of the grille with the top two lines intercepting the Alphard logo and there are only 5 vertical lines.

Toyota Alphard NFL Grille For new-facelifted model, there are some slight variations on the number of horizontal grille lines for both model. Alphard G (photo on the left) has three horizontal grille lines across the center of the grille with the top two lines intercepting the Alphard logo. There are still many vertical lines but now they are more slanted to the center.

Alphard V (photo on the right) now comes with two horizontal lines and the 5 vertical lines are slightly thicker compared to the pre-facelifted model.

What is more significant to the original buyers in Japan is that these G or V models are actually supplied by two chain of dealers, ToyoPet and Netz (http://netz.jp/). ToyoPet (which is one of Toyota business unit) supply the G model while Netz supply the V model. Therefore, at time you might see a sticker on the tailgate that reads "Yokohama Toyopet" which means that is a G model supplied by the ToyoPet dealer in Yokohama.

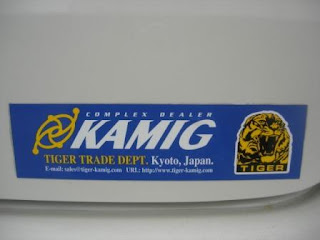
There are also regional complex dealer that obtain the car from either of the master distributor and sell it to end user. Therefore at time you might see some sticker like the one below.

Toyota Alphard Dealer Logo
Updates: Starting with the 2nd generation Alphard, ToyoPet supplies Toyota Alphard only while Netz supplies Toyota Vellfire.